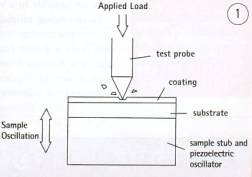
| Micro-impact testing is a new repetitive contact technique, developed by Micro Materials, that is becoming more widespread as companies seek to optimise coating adhesion, toughness and resistance to erosive wear. Its usefulness lies in its ability to simulate the wear conditions occurring in fatigue processes more closely and more quickly than in traditional tests. How the Technique Works The technique itself, figure 1, builds on the company's existing NanoTest nano-scale indentation and scratch testing technology. The key modification for this technique involves attaching a piezoelectric oscillator to the sample holder and connecting it directly to a signal generator. When the signal generator is switched on the sample is oscillated at high frequency (in the directions shown by the double-headed arrow) causing either impact or contact fatigue behaviour, depending on the energy supplied to the probe. With a small oscillation amplitude the probe remains in contact with the surface, causing a periodic compressing and relaxing of the surface at the contact point. This repetitive stress-cycling leads to contact fatigue, and ultimately fracture and debonding. At higher oscillation amplitudes the probe ‘bounces’ on the surface, continually impacting and recoiling from the surface. When there is a change in contact energy, e.g. when it becomes energy absorbing after fracture of the surface or debonding of a coating, a change in probe recoil occurs. Coating wear during the test is followed in real-time by monitoring the change in probe depth. | 
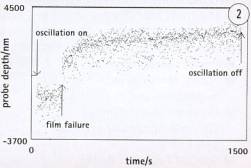
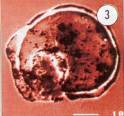
| | Figure 1. Operating principle of the impact technique. | What the Results Mean Figure 2 shows a typical result from an impact test on a TiN coating. A static load of 100mN was applied throughout the test. Previously it had been checked to make sure that there was no coating failure at this load during normal indentation tests. After a 30-second loading period to allow for creep, the sample was oscillated at 80Hz. The probe immediately began repetitively impacting the coating surface, leading to the gradual accumulation of surface damage by a fatigue process. This resulted in an instantaneous abrupt change in probe position after 250 seconds, indicative of catastrophic failure with the change in probe depth corresponding to the coating thickness. SEM images of test surfaces examined after impact testing confirmed adhesion failure. The SEM image in figure 3 shows the surface from a test stopped just after the failure point -a clear impact crater can be seen. Comparison of several SEM images, from tests stopped at different times, revealed a fatigue process with steadily enlarging circular cracks, leading to adhesive failure. | 
| | Figure 2. Micro-impact testing of a titanium nitride coating on silicon. | | 
| | Figure 3. Impact crater after impact-induced adhesion failure of a titanium nitride coating on silicon. | How Impact Testing can be Used in Product Development During a typical coating development programme, a large R&D department will make (often fairly indiscriminate) use of many of the methods currently available to evaluate coating performance. However, this ‘scatter-gun’ approach can have its problems. Test data is only useful if the laboratory test simulates the actual contact conditions experienced in service, so that the results can be used with confidence to solve industrial wear problems. For example, it has been found that when coatings experience repetitive impact or erosion during service, the results of ‘single-shot’ characterisation methods such as scratch testing do not always correlate well with final product performance. Under these conditions, coatings often fail by a fatigue process (after a large number of cycles at stresses lower than the yield strength). The applied loads necessary to produce failure of well-adhering coatings in a normal scratch test are often too high to correspond to many in service situations. Instead, it has been found that sample oscillation during a constant load scratch test can cause rapid coating debonding when scratch testing on its own is insufficient at similar contact pressure. The time to failure is related to the strength of coating-substrate adhesion, so the results of the test can be used to optimise the coating process. Impact Testing in Microelectronics The impact technique is also finding new applications in microelectronics. In particular, polymer/nonpolymer interfaces (such as polyimide-SiO2) can be a worrying concern for package and interconnect reliability. The materials have widely differing physical and mechanical properties, which can eventually lead to stress build up, and ultimately interfacial delamination resulting in component failure. The test probe can be accurately located on small areas of interest on the chips with the aid of a high resolution microscope fitted to the NanoTest, figure 4. When the amplitude of oscillation is low the probe remains in contact with the surface, causing repetitive stress-cycling, which leads to contact fatigue. Because the sample is oscillated at high frequency, extended (high-cycle) fatigue tests are possible in a very short time. | 
| | Figure 4. Accurate probe positioning for impacting on integrated circuits is possible with the NanoTest high resolution microscope.. | Potential for the Technique Since coating reliability under-pins industries such as aerospace, biomedical devices, ceramics, automotive, wear resistant coatings, polymer films, packaging, and microelectronics, it would appear that the applications of the technique will be far-reaching, particularly in adhesion testing. |