Implementing dimpling technologies, materials science sample preparation for TEM is now an established practice. A crucial component of this procedure is the capacity to precisely calibrate the dimpling instrument in relation to the center of the sampling holder.
Historically, this method has proved reasonably time consuming, necessitating the utilization of an optical microscope and multiple sample iterations. This study lays out an effectual stage alignment technique that can be performed in just a few minutes, and which will precisely calibrate the sample stage to the dimpling instrument.
Procedure
The 84000 PELCO® Dimpler™ is a precision dimpling tool engineered to fabricate TEM samples for analysis. Accurate calibration of the center section of the platen assembly is crucial when generating samples for TEM. Samples are 3 mm in diameter, and consequently accurate calibration of the dimpling instrument and the center of the sample is vital.
The 84000 PELCO® Dimpler™ is a precision measuring tool utilizing a non-contact z-height sensor, and can be implemented to ascertain the actual specimen thickness in real time. With the use of the sensor, an accurate calibration process can be performed alongside conventional instruments obtainable within the system.
The PELCO® Dimpler™ should be switched on for at least an hour before dimpling specimens. This allows the instrument to attain a state of thermal equilibrium for optimal accuracy.
Once this has been reached, the system should be adjusted to regular operating mode, in which the arm is balanced and the system all set for standard operation.
- Situate the standard platen onto the stage of the 84000 PELCO® Dimpler™ . This platen possesses a narrow hole in the center that is utilized in the calibration procedure. Refrain from mounting a sample or placing the sapphire flat onto the platen.
- Flick the toggle switch of the Force / Z Height measurement to Z (µm). Fix the force to 50 grams.
- Install the 3i tool (stainless steel dimpling instrument) onto the shaft of the Dimpler. Fasten in place.
- Revolve the shaft of the system until the Tool Index LED is lit up.
- Push the ARM DN button. The arm should be lowered and the instrument will settle on the platen.
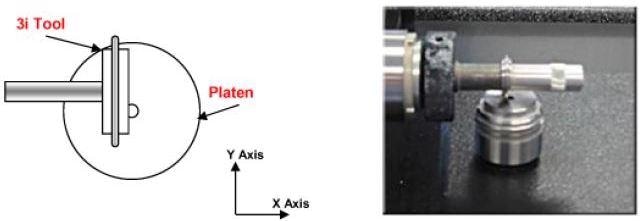
- Modify the platen utilizing the X and Y translation screws of the stage so the 3i instrument is readjusted from the platen center hole (Figure 1).

Figure 1. Schematic drawing at left showing the offset position of the dimpling tool. The image at right shows the configuration of the tool and platen during the initial phase of the alignment process.

This information has been sourced, reviewed and adapted from materials provided by Ted Pella, Inc.
For more information on this source, please visit Ted Pella, Inc.