An aspheric lens, or apshere, is an optic with surfaces defined via a polynomial equation. Aspheres exhibit rotational symmetry around the optical axis, but their radius of curvature alters in line with its distance from the center.

Image Credit: PI (Physik Instrumente) LP
Aspheric lenses deliver improved performance compared to traditional lenses, allowing a notable reduction in mass, size and number of elements used – key features for developers looking to miniaturize devices.
Manufacturers of telescopes, cameras, confocal microscopes, 3D imaging systems, and medical instruments employ aspheres to improve their products. The common phrase: “Where there is light, there must be shadow” is also true in the case of aspheres.
These lenses require complex and innovative technologies to deliver the required levels of production and metrology – much more than that of traditional lenses.
A number of methods are suitable for the quantification of aspheres’ surface accuracy, with different manufacturers making use of both contact and non-contact devices.
6-D - Non-Contact Surface Metrology for Aspheric Optics with 6-Axis Hexapod Motion System | PI
Video 1. Video Credit: PI (Physik Instrumente) LP
Tilted Wave Front Interferometry (TWI) is a novel non-contact metrology method that leverages the multi-axis flexibility and accuracy of hexapod parallel kinematics 6-axis motion systems to position a calibration sphere properly.
Developed by metrology specialist Mahr, TWI combines speed and flexibility into a single process. This new machine can measure surface shapes directly on the production line with high lateral resolution, with a measuring uncertainty of less than 50 nm.

Hexapod 6-axis motion systems come in different sizes for application from alignment of tiny silicon photonics components to positioning heavy mirrors in astronomical telescopes. Image Credit: PI (Physik Instrumente) LP
The Measuring and Referencing Process
This new metrology system obtains several sub-apertures that are active at different times before combining individual interference patterns to form a single pattern.
In order to enable meaningful data acquisition with a calibration sphere, this system requires the use of a highly precise positioning system that offers <0.5 µm repeatability and <5 µm lateral position accuracy.
To test micropositioning systems such as the hexapod or even higher precision nanopositioning systems, nano-metrology equipment and special laboratories are required.

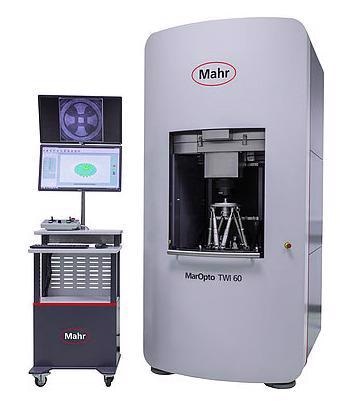
Fast Metrology: It only takes 20 to 30 seconds for the MarOpto TWI 60 to measure the entire surface of an aspheric optic. Image Credit: Mahr
Fast Programming of 6-DOF Hexapod 6-Axis Motion Stewart Platform: Software, Mechanics, Controller
Video 2. Hexapods are more flexible than conventional multi-axis positioning systems. Video Credit: PI (Physik Instrumente) LP

This information has been sourced, reviewed and adapted from materials provided by PI (Physik Instrumente) LP.
For more information on this source, please visit PI (Physik Instrumente) LP.