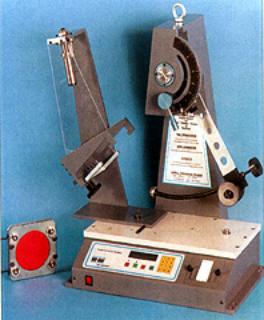
| Armchair shopping on the internet and the advent of virtual reality imaging will soon change our lifestyle. Many products will be purchased from within our own living rooms and delivered directly to our homes. The supplier will often be obliged to use transportation that gives them no control over the way goods are handled. Packaging problems will undoubtedly occur if inadequate materials are used, and in most cases, this will be the result of impact damage. Impact Damage and Packaging Impact is a very complex phenomena, requiring expert knowledge to appreciate the implications and events, which take place so quickly that the human eye can only observe the after-effects. It is extremely difficult to provide packaging engineers with fundamental information that can easily be applied. Often, the only answer is some form of physical testing. Existing Impact Testing Equipment for Packaging Materials The test equipment presently available is not always suitable, or affordable. Some apparatus are very basic, without instrumentation, and require the operator to observe and interpret the degree and type of failure. Many companies have not been able to satisfactorily produce reliable round robin test results that can be used for quality assurance purposes. At the other extreme, equipment is available with extensive instrumentation and advanced computer presentations, including graphical displays with transient capture analysis and sampling rates in excess of 20 kHz of the failure event. These are more likely to be found in the larger companies, universities and research centres. Identifying a Suitable Testing Technique In view of this situation, Ray-Ran looked for a new test method that would require the minimum of instrumentation that could provide accurate and reliable test results in a cost-effective way. To achieve this goal, the parameters did not include transient event monitoring, which was decided could generally be regarded as a research requirement rather than ‘fit-for-purpose test’ and basic quality control. However, a definitive test result for each sample tested was crucial to the design if a viable answer was to be found. Several test methods were investigated and later abandoned because the test results were not sufficiently reliable. In some instances, the test method appeared the right approach to take, but the test samples proved difficult to produce economically. The Puncture Impact Test The puncture impact system using a swinging pendulum arm overcame all of the previous difficulties. A round test sample, clamped around its periphery, was selected. This shape ensures that the orientation of the test sample relative to the production process does not influence the test results. For example, residual stresses can sometimes be present in the material as a result of a particular manufacturing process. If the formation of these stresses is unidirectional, then the material is sensitive to the way in which loads are applied. The impact puncture pendulum test lends itself to measuring the test result as units of energy to break the test sample. It is unlike Izod, Charpy and Tension impact tests, in that these have a critical section/zone in the test sample that encourages the failure to take place. For instance, when using dumbbell or notched specimens, the test results must reflect these profiles by expressing the test results as the energy per unit width, or the energy per unit of cross sectional area of the test sample. How The Pendulum Impact Test Works The pendulum design incorporates a swinging arm carrying a tup, which punctures completely through the test sample on impact, figure 1. The impact energy of the pendulum is selected so that the energy to break the test sample falls within 20-80% of the pendulum's energy, thereby ensuring a complete failure will always be obtained, but at the same time, having a compatible energy ratio between the sample and pendulum to ensure consistent results. The tup strikes the test sample at its centre of percussion - the point on the pendulum through which the resultant of all the forces acts. | 
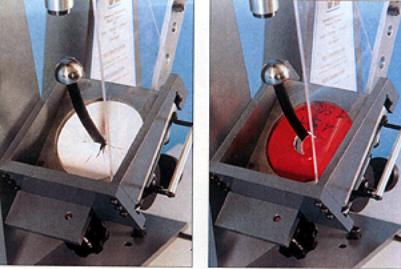
| | Figure 1. The pendulum impact testing system. | Sample Size The diameter of the test sample was chosen to be the same size, 5 inches, as the ASTM D 1709 for drop dart testing. Although the drop dart test results are expressed as a weight, it is a very simple procedure to convert the drop dart results into an energy and compare them with the test results obtained using the impact puncture pendulum tester. How Puncture Impact Strength is Determined The apparatus shown in figure 1 is a dedicated, rnicroprocessor-controlled puncture impact tester, which continually monitors the swing path position of the pendulum. When the pendulum is released, the height reached at the end of its first swing arc is compared to the start position. The loss in height is directly proportional to the loss in energy, and therefore allows simple instrumentation to be used to measure the energy. Calibrating the Pendulum Impact Tester When the pendulum is released without a test sample placed in the swing path, the energy loss is solely due to the friction in the support bearings and the windage created by the pendulum's movement. This simple procedure is used to calibrate the apparatus every time it is used. When the test sample is placed in the swing path, the energy taken to h the test sample is measured by comparing the reduction in the swing height of the pendulum with calibrated height. Computer Aided Control A special computer program helps select the pendulum energy for a given material. After just one test, the result is entered into the computer and advises the energy required. This can be achieved by adjusting the pendulum velocity and/or weight. The velocity is altered by adjusting the drop height and the weight is altered using bolt-on calibrated weights. The computer simultaneously displays, material impact energy range that can be tested together with the percentage variation in the material impact strength that can be measured. Benefits of Using the Pendulum Impact Tester The benefits of the apparatus go beyond the role of just providing comparative material impact data. The pendulum can also be fitted with different shape tups to produce different types of failure. For example, a large radius domed tup produces a high degree of lateral elongation of the material during failure, figure 2 whereas a sharper profile tup produces a more tle/tear type of failure, figure 3. Service conditions also be investigated by using tups that are contoured to simulate the items to be packaged. | 
| | Figure 2. A typical ductile fracture (left) and a typical brittle fracture (right). | Summary The puncture impact pendulum tester allows all test data to be established quickly, and the apparatus can serve as a research tool as well as quality control assurance. It is hoped this method will lead to a new test standard being established for the benefit of the whole packaging industry. |