The advent of modern batteries, such as Li-ion, has transformed our daily lives, facilitating the proliferation of smart devices, environmentally friendly electric vehicles, and sophisticated power management solutions. Moreover, batteries hold promise as cost-effective options for large-scale energy storage, complementing renewable energy resources in power grid applications.
Image Credit: petrmalinak/Shutterstock.com
Regardless of the cathode chemistry, be it LFP or NCM-based, the majority of commercial batteries rely on graphite as their primary anode material.
Battery-grade graphite can be sourced either naturally through mining or synthetically from petroleum coke—a byproduct from petroleum refining—by subjecting it to temperatures exceeding 2500 °C.
Synthetic graphite, prized by EV battery manufacturers for its consistency and performance, currently dominates the anode supply chain.
Degree of Graphitization
Synthetic graphite quality is commonly measured using a parameter known as the degree of graphitization. The degree of graphitization gauges the degree of similarity between synthetic graphite and ideal graphite.
Petroleum coke exists as a disordered form of carbon, whereas graphite exhibits a highly ordered crystalline structure. As coke is heated to high temperatures, it progressively transitions into crystalline graphite.
However, during industrial-scale production, this transformation into a fully crystalline graphite micro-structure may fall short of completion, resulting in residual disorder in the final product.
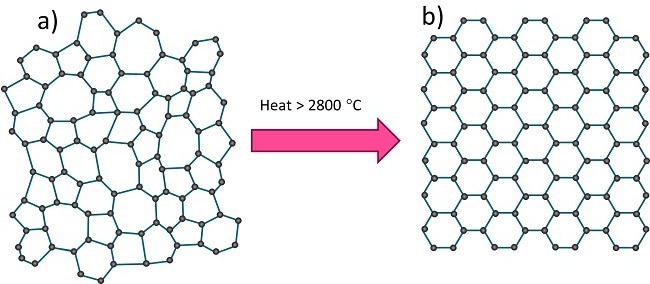
Figure 1. Schematic atomic structures of a) disordered carbon (coke), and (b) crystalline graphite. Image Credit: Malvern Panalytical Ltd
Within graphite, carbon layers exhibit an ordered arrangement stacked along the c-axis that maintains a spacing of 0.3354 nm. In crystallographic terms, this distance corresponds to the interplanar spacing between 002 planes. Conversely, in disordered carbon, this spacing expands to 0.3440 nm.
As disordered carbon undergoes graphitization, the interplanar spacing (d-spacing) diminishes, approaching that of crystalline graphite. By measuring the d002 interplanar spacing of synthetic graphite, the degree of graphitization (g) can be estimated using Equation 1 below:

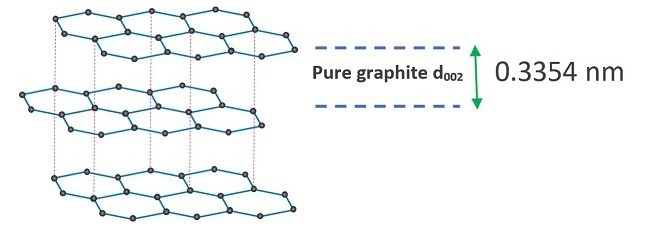
Figure 2. Schematic of pure crystalline graphite stacking along the c-axis, showing 002 spacing between crystal planes. Image Credit: Malvern Panalytical Ltd
Measuring the Degree of Graphitization
X-Ray diffraction (XRD) is the optimal method for quantifying the degree of graphitization since it directly measures interplanar d-spacings. Below, you will find an illustration of an XRD measurement setup:
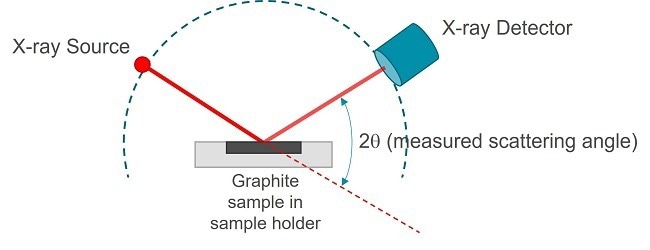
Figure 3. Schematics of an X-Ray diffraction measurement. Image Credit: Malvern Panalytical Ltd
The interplanar d-spacing can be derived from the measured 2θ position of the XRD peak by employing Equation 2 below:

where λ = 0.154 nm (for a Cu Kα X-Ray source).
Given the minute discrepancy of 0.0046 nm between the interplanar spacings of carbon and graphite d002, an extremely precise determination of the peak position is imperative to accurately estimate the degree of graphitization.
Absolute measurement of the peak position is susceptible to errors stemming from various sources, including fluctuations in sample height during sample preparation, instrument misalignment, as well as other factors.
Consequently, relying solely on absolute peak position measurement in XRD may yield unreliable results regarding the degree of graphitization. However, the impact of these errors can be mitigated by incorporating an internal reference standard with a known XRD peak position value.
This standard, characterized by a distinct, intense peak closely aligned with, yet clearly separated from, the graphite peak, serves as a benchmark for measurement accuracy. Pure silicon powder, with its peak of 111 closely resembling graphite’s 002 peak, serves as a suitable internal reference standard for gauging graphitization degree in carbon materials.
Additionally, other crystalline materials like quartz, corundum, or rutile can fulfill this role. Typically, a 20-weight percentage of the reference standard mixed into the graphite sample suffices for the analysis.
If silicon is employed as the reference standard, a diffractogram measured with Cu Kα radiation between 25-30° 2θ provides both the 002 peak of graphite and the 111 peak of silicon. Data generated by an Aeris compact XRD instrument from such a sample is depicted in Figure 4 below.
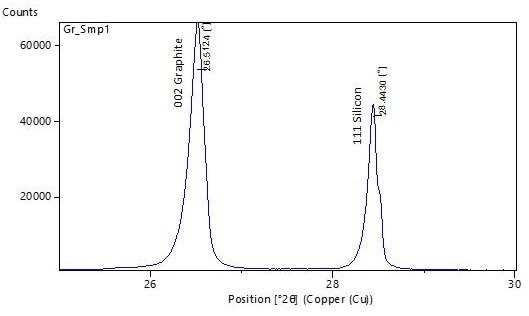
Figure 4. XRD pattern of synthetic graphite sample mixed with a silicon reference standard, measured on Aeris compact XRD. Image Credit: Malvern Panalytical Ltd
The silicon 111-peak is theoretically positioned at 28.44° 2θ. The measured diffractogram needs to be adjusted so that the observed silicon 111-peak aligns with the theoretical value.
The d002 spacing for synthetic graphite can be computed from the measured 002-peak position utilizing Equation 2, followed by the assessment of the degree of graphitization using Equation 1.
Table 1, presented below, outlines the degree of graphitization measured across five synthetic graphite samples using the Aeris compact diffractometer.
Table 1. The degree of graphitization measured in five synthetic graphite samples, using an Aeris compact diffractometer and a silicon reference standard. Source: Malvern Panalytical Ltd
| Sample |
Graphite peak position
after reference correction (2θ) |
d002 |
g% |
| Gr_Smp1 |
26.51 |
3.3611 |
91.7 |
| Gr_Smp2 |
26.55 |
3.3561 |
97.5 |
| Gr_Smp3 |
26.49 |
3.3636 |
88.9 |
| Gr_Smp4 |
26.52 |
3.3599 |
93.2 |
| Gr_Smp5 |
26.50 |
3.3623 |
90.3 |
Orientation Index
This parameter pertains to the graphite coatings applied to current collectors. Depending on the coating process and control parameters, graphite particles may exhibit specific orientations, as shown in Figure 5.
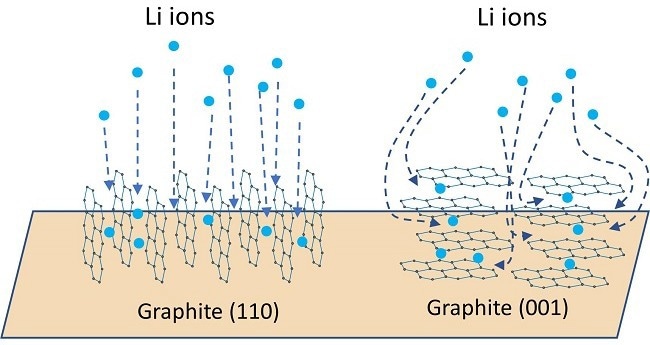
Figure 5. Schematics of Li intercalation pathways for graphite 110 and 001 orientations. Red arrows show the direction of the c-axis. Graphite has poor ionic and electronic conductivity along its c-axis. Image Credit: Malvern Panalytical Ltd
Different orientations, such as 110 and 100, where the c-axis of the graphite aligns within the plane of the current collector, provide notably enhanced electronic and ionic conductivity compared to the 001 orientation in which the c-axis is oriented out-of-plane from the current collector.
Due to their elongated crystallographic shape, (long c-axis) graphite particles tend to be oriented along the 001 direction, resulting in elevated resistance to ion transport.
However, their orientation can be randomized by agglomerating these particles into spherical shapes, thereby generating improved ionic conductivity. Moreover, under the influence of strong magnetic fields, these particles can be preferentially oriented along the 100 or 110 directions, further raising their ionic and electronic conductivities.
The collective crystallographic orientation of graphite particles within the coating can be measured using a parameter referred to as the orientation index. A random orientation implies an equal weight fraction of graphite particles oriented along the 001 and 110 (or other) crystallographic axes.
The orientation index (OI) is defined as the ratio of weight fraction oriented along, for example, 110 (or any other direction orthogonal to 001) to that aligned along 001.
Therefore, the OI represents the ratio of the weight fraction of particles with their c-axis in the plane of the current collector to the weight fraction of particles with their c-axis out of the plane of the current collector. For random orientation, the OI value would equal one. If particles preferentially align along 001, the OI would be less than one.
Measuring Orientation Index
XRD provides a convenient and accurate method for assessing the OI in graphite coatings. The simplest way to estimate it is from the ratio of the 110 and 004 (fourth-order reflection of 001 planes) peak intensities (areas).
Theoretically, in a graphite material with random orientation, f = I110/I004 = 0.63. A value lower than 0.63 would suggest that particles are preferentially oriented along 001. Sometimes, the intensity ratio, R = I004/I110 (=1/f), is measured instead. In a random orientation, R = 1.6 and values greater than 1.6 indicate a preferred orientation along 001.
When measured with Cu Kα radiation, the theoretical peak positions for 004 and 110 reflections are at 54.29° and 77.37° 2θ, respectively. An example pattern of a graphite coating on a Cu current collector is represented in Figure 6 below:
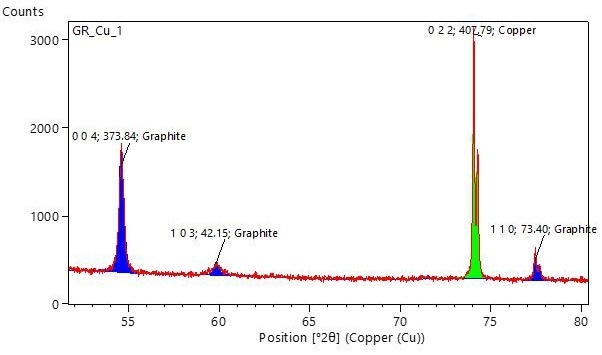
Figure 6. Example XRD pattern showing the 004 and 110 peaks of graphite, which can be used to estimate parameters f or R for the relative comparison of preferred orientations in different samples. Image Credit: Malvern Panalytical Ltd
The labels on this graph indicate the hkl index, peak area, and crystal phase. In this case, the areas of the 004 and 110 peaks are 373.84 and 73.40, respectively. Consequently, f = 73.40/373.84 = 0.20, and R = 5.1, signaling a preferred orientation along the 001 axis.
Parameters f and R do not yield an absolute value of the orientation index. Nonetheless, they serve to compare preferred orientations among different sample batches. A lower f value (or higher R value) indicates a greater degree of orientation along 001, while an f value of 0.63 (or R value of 1.6) suggests a random orientation.
Absolute orientation index values can be obtained through Rietveld refinement of the complete XRD pattern and by employing the March Dollase (MD) function to model the peak intensity variation resulting from the preferred orientation along a specific orientation. Rietveld refinement also corrects for the peak intensity variation caused by the finite thickness of the coating layer.
Given that the graphite layer is typically just a few tens of a micrometer thick, X-Rays penetrate through the entire layer beyond a certain 2θ angle. The presence of Cu peaks in the XRD pattern indicates that X-Rays have penetrated through the graphite layer and diffracted from the current collector.
The finite thickness results in reduced peak intensity at higher angles. Rietveld refinement can simulate this finite layer thickness, generating precise OI results. The March Dollase orientation parameter assumes a value of 1 for randomly oriented samples, with lower values indicating a preferred orientation along a specific direction.
An example of the orientation index derived from full-pattern Rietveld refinement of the XRD pattern can be seen in Figure 7.
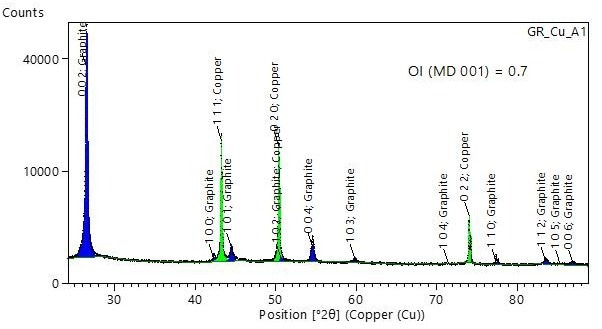
Figure 7. Example XRD pattern measured in the angular range of 25° to 90° 2θ. The pattern was Rietveld-refined, including finite thickness correction and March Dollase preferred orientation along 001 (MD 001). Image Credit: Malvern Panalytical Ltd
Results from five samples of two different types are presented in Table 2.
Table 2. Orientation index measured with XRD on five samples, using the intensity ratio and March Dollase methods. Source: Malvern Panalytical Ltd
| Sample |
f |
R |
MD 001 |
| Random orientation (Theoretical) |
0.63 |
1.6 |
1 |
| GR_Cu_A1 |
0.2 |
5.1 |
0.7 |
| GR_Cu_A2 |
0.17 |
6 |
0.68 |
| GR_Cu_A3 |
0.26 |
3.8 |
0.77 |
| GR_Cu_B1 |
0.06 |
17.5 |
0.51 |
| GR_Cu_B2 |
0.09 |
11.4 |
0.56 |
The March Dollase orientation parameter can be reliably ascertained from a shorter-range XRD measurement between 40° to 58° 2θ, thereby substantially reducing measurement duration. Additionally, this range can be covered by a large detector operating in static mode, facilitating the potential for real-time online measurement of the OI.
XRD Instrument Selection
Both a compact XRD, such as the Aeris XRD, or floor-standing XRD, such as the Empyrean XRD, can be employed to analyze the degree of graphitization and the OI in graphite powders and coatings.
Aeris XRD
Aeris XRD is a compact XRD available in 600W or 300W versions. The typical sample measurement time is 5-10 minutes but can be significantly faster in this type of application.
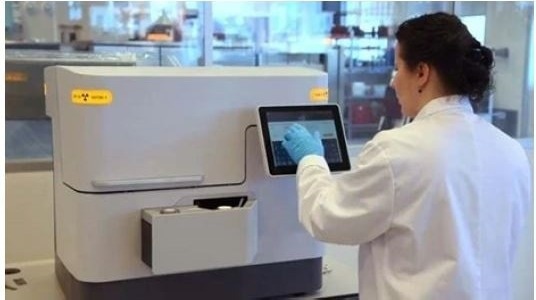
Image Credit: Malvern Panalytical Ltd
Key system features:
- No requirement for an external chiller or computer;
- Simple touchscreen functionality;
- Accommodation for up to six positions in the autosampler;
- Compact design and minimal maintenance needs;
- Ability to handle coated electrodes with a maximum sample size of up to 35 mm.
Empyrean XRD
Operating at 1800W, this full-power XRD system offers a typical sample measurement time of 5 minutes.
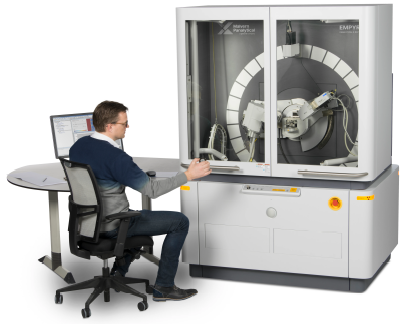
Image Credit: Malvern Panalytical Ltd
Key system features:
- Superior data quality facilitated by monochromatic optics and an energy-dispersive detector;
- Accommodation for up to 45 positions in the autosampler, ensuring high throughput;
- Capability to analyze large electrode samples.
Online XRD
Malvern Panalytical specializes in online automation tailored for roll-to-roll processes and offers customizable solutions based on roll width and other process parameters.
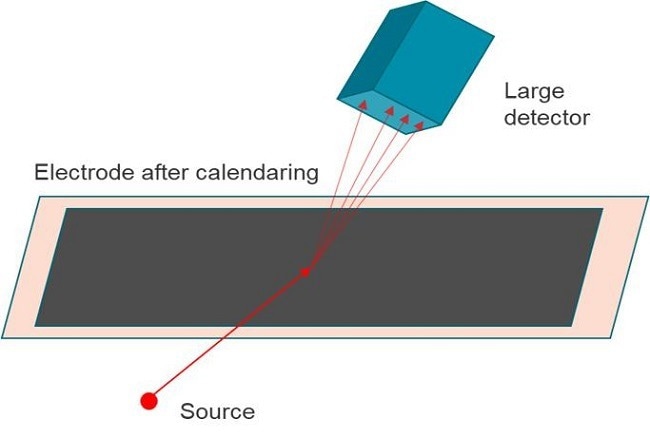
Figure 8. Schematics of an online XRD. Image Credit: Malvern Panalytical Ltd
Key online XRD features:
- Rapid static-mode measurements facilitated by a large detector;
- Real-time online data available for electrode coating OI;
- Comprehensive automation for measurement and analysis processes.

This information has been sourced, reviewed and adapted from materials provided by Malvern Panalytical Ltd.
For more information on this source, please visit Malvern Panalytical Ltd.