Introduction
Surface roughness is an important parameter for evaluating the quality of material surfaces since it directly affects the tribological and optical properties of the materials [1-3]. Although two kinds of methods, stylus profiling and optical scattering, are widely used for measuring surface roughness [4-6], both of them have disadvantages which are not appropriate for practical applications. For example, the stylus method, owing to its mechanical contact measurement, can damage the material surface when the surface to be evaluated is delicate or fragile. The optical method can provide noncontact measurements based on light beam irradiation. However, the upper limit of the measurable range of the roughness parameter is less than 1 μm because of the short wavelength of light [6]. Therefore, it is desirable to have an alternative noncontact technique for measuring a relatively large range of roughnesses, such as from 1 μm to 100 μm. The use of acoustic waves whose wavelength is generally much greater than electromagnetic of optics for the measurement of surface roughness have received considerable attention [7]. Although there have been several experimental attempts on ultrasonic roughness measurement [8-15], most of them have used immersion techniques employing water or any liquid as a coupling medium. In many cases, the use of water or any liquid is often undesirable since they may cause severe degradation of material surfaces having low water resistance. Therefore, the noncontact measurement is much preferable for many industrial applications. Air-coupled ultrasound [16-18] which can provide noncontact measurement without any liquid couplant can be a promising candidate for surface roughness evaluation. Although some ultrasonic measurements using air-coupled ultrasound have been performed [19-21], the application to surface roughness evaluation has never been studied. In our previous work [22], we had used an air-coupled ultrasound with broadband capacitance transducers [17] for characterizing specimen surfaces with a relative large range of roughnesses, root-mean-square roughness Rq, up to 244 μm. We had shown in that work that the Rq can be characterized from the coherent component of the scattered ultrasonic wave of the rough surface. However, the Rq mainly reflects height information of the surface geometry and therefore lateral information is hardly obtained from the Rq. In order to obtain more detailed description of the surface geometry, another parameter that is closely related to the lateral information of the surface geometry is needed. Since it is known that an incoherent component of scattered waves is related to surface correlation length λo which describes the lateral information of surface geometry [7], it is interesting to examine the use of the incoherent component to characterize the surface correlation length λo. In the present paper, theoretical and experimental investigations have been made to examine the relationship between the λo and the incoherent component of scattered waves. A pair of broadband capacitance transducers has been used in a reflection configuration to measure scattered waves at various scattering angles from the specimen surfaces. The relationship between the amplitude of the scattered waves and two statistical parameters of surface profile, Rq and λo , has been examined. The measured results have been compared with theoretical ones calculated from the Kirchhoff-based scattering model.
Scattered Ultrasonic Waves from Rough Surfaces
The scattered ultrasonic wave from a rough surface is considered to be a superposition of coherent component reflected at specular reflection angle and incoherent component at non-specular reflection angle [22]. The composition of those components in the scattered waves depends on the degree of roughness. Rougher surface increases the incoherent component and reduces the coherent component. Using the Kirchhoff theory under some assumptions of plane wave incidence, a single scattering event, Gaussian distribution of surface height, Gaussian correlation function of surface height, and far field conditions, the intensity of the overall scattered field can be written as [23]
 (1) (1)
The coherent component of the scattered field is regular and in phase with the incident wave and for scattering geometry shown in Figure 1 is given by
 (2) (2)
where Io is the energy reflected from a smooth surface,  , k is the wave number, Rq is the root-mean-square roughness, and θi and θr are incident and reflected angles, respectively. The incoherent component is irregular and has a lack of phase matching with the incident wave and is given by [23] , k is the wave number, Rq is the root-mean-square roughness, and θi and θr are incident and reflected angles, respectively. The incoherent component is irregular and has a lack of phase matching with the incident wave and is given by [23]
 (3) (3)
where F=(1+cosθi+θr)/ (cosθi+θr), A=sinθi-sinθr, r is the distance of the scattering point away from the surface, AM is the area of the mean plane of the surface, and λo is the surface correlation length. We can see from equations (2) and (3) that coherent component depends mainly on Rq, while the incoherent component depends on both Rq and surface correlation length λo. Therefore, both of coherent and incoherent components can be used for evaluating quantitatively the parameters of Rq and λo.
Figure 1. Scattering geometry used in the experiment.
Experimental Procedure
A pair of broadband air-coupled capacitance transducers (Micro Acoustic Co., BAT, Canada) having a center frequency of 0.5 MHz was used in a pitch-catch configuration [22]. The diameter of each transducer is 10 mm. The working distance between the transducers and specimen surface was 35 mm. A square-wave pulser (Ritec, SP-801A, USA) and a broadband receiver (Ritec, BR-640A, USA) were employed to transmit and receive wide-band ultrasonic pulse waves. The ultrasonic signals were acquired using a serial acquisition board at a sampling rate of 100 MHz, then signal processing and data analysis were performed with a personal computer running LabViewTM software. Pulse-echo measurements were taken using the transducers operating with a repetition rate of 0.5 kHz. The ultrasonic waves were incident to the specimen surface with an incident angle of 60° and scattered waves were measured at angles from 0° to 80° at intervals of 5°. In order to reduce the background noise of the measured signals, the average values were obtained from hundred acquired signals at each scattering angle. Five independent measurements were made at different locations for each specimen and the average values of the peak-to-peak amplitude of the measured signal are used for discussion. For the measurement condition used in this work, the evaluation area (insonified area by ultrasound at specimen surface) was considered to be about 10 mm in diameter.
Specimens
Nine kinds of sandpaper sheets having different grit sizes were used for the specimens. The sandpapers were bonded to a steel plate to make them flat. A polished stainless-steel plate was used as a reference specimen having a smooth surface. Figure 2 shows the surface profiles of the specimens measured by a stylus profilometer (Tokyo Seimitsu, SURFCOM3000A, Japan) using a 2 μm radius tip with 0.7 mN stylus load traced in a length of 40 mm on the surfaces. Although there are several parameters for evaluating surface roughness, such as average roughness Ra, maximum peak-to-valley height Ry and other parameters (JIS B0601) which are devised to quantify the information from the surface profile data obtained by a stylus method, the parameters which closely related to the scattering phenomenon of ultrasound used in this work were root-mean-square roughness Rq and surface correlation length λo as shown in equations (2) and (3). The empirical relation between the average roughness Ra and root-mean-square roughness Rq can be found for a Gaussian height distribution of the surface profile, that is Ra≅0.8Rq [24]. The Rq, Ra or Ry are related to the height characteristics of surface profile. However, the surface correlation length λo relates to the lateral characteristics of surface profile. Since two different surfaces may have the same values of Ra or Rq [25], the lateral information of λo is useful to distinguish such surfaces.
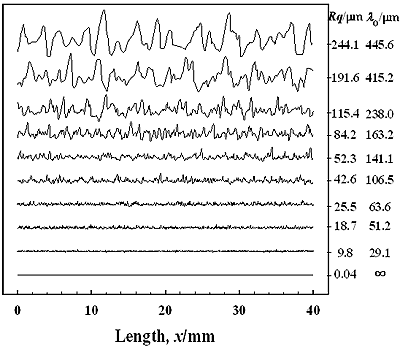
Figure 2. Surface profiles of each specimen measured by a stylus method.
Root-mean-square roughness Rq is calculated as the variance of the vertical dimension of the surface height h(x). For the discrete case, Rq is given by [26]
 (4) (4)
where N is the number of data points, hi is the height at each point in the surface profile, and  is the average height of the surface profile. The surface correlation length is obtained from autocorrelation function of h(x). The autocorrelation function for a spatial displacement of x’=nΔx is given by [26] is the average height of the surface profile. The surface correlation length is obtained from autocorrelation function of h(x). The autocorrelation function for a spatial displacement of x’=nΔx is given by [26]
 (5) (5)
where hi+n is a point with a spatial displacement from the point hi, n is an integer ≥0. The surface correlation length λ ο is defined as a distance x’ at which C(x’) is equal to 1/e [26]. Surface correlation length λ ο provides information about average lateral distance between the peaks of rough surface. According to Takafuji et al. [24], λο is equal to the reciprocal of the number of dominant peak per unit length (PPI), λo≅1/PPI. Therefore, surface correlation length can be considered to be a dominant spatial frequency of surface profile. The Rq and λo of the sandpapers used are in the range from 9.8 to 244.1 μm and from 29 to 445 μm, respectively as shown in Figure 2. Figure 3 shows autocorrelation function of the height C(x’) for the specimen having Rq=42.6 μm. The theoretical Gaussian correlation function is also depicted in Figure 3. The statistical properties, such as the height distribution [22] and the correlation function of height of the specimen surface, are well approximated by the Gaussian.
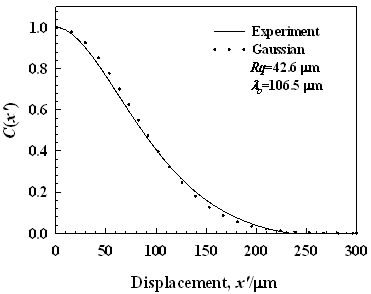
Figure 3. Autocorrelation function of the height of the specimen having Rq=42.6 µm.
Results and Discussion
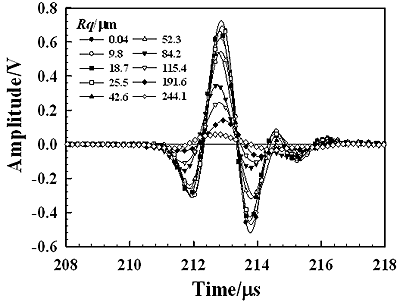
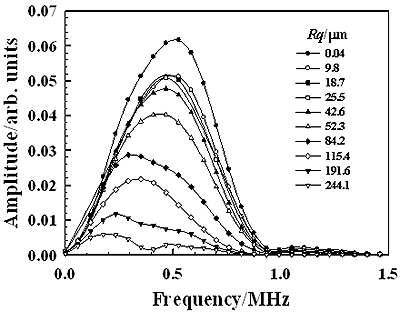
Figure 4 shows the change in the amplitude of the scattered wave with the scattering angle for each specimen. Peak-to-peak amplitude of the measured pulse signal is used here. We can see that each curve of the amplitude variation has a peak at the reflection angle of 60° and the amplitude of the peak gradually decreases as scattering angles are apart from 60°. Since the incident angle is 60°, the reflection angle of 60° is the specular angle at which the ultrasonic wave is strongly reflected by the specimen surface. For the specular angle, the reflected wave components from the irradiated area are in-phase and therefore such phase matching among the components makes a strong amplitude reflection. Such a component is called a coherent component. The relationship between such a coherent component and the surface roughness has been discussed in the previous work [22]. Figure 5(a) shows the waveforms of the coherent component for different values of Rq obtained at the reflection angle of 60° and Figure 5(b) shows their frequency spectra. Figure 6 shows the relationship between the amplitude of the coherent component and the normalized roughness Rq∙f [22] for frequency components of 0.25, 0.5, and 0.75 MHz in Figure 5(b). The solid line is the theoretical result calculated from equation (2). It is shown that the measured amplitude agree well with the theoretical one in the range of Rq∙f less than 50 ms-1. A disagreement between the measured and theoretical in the range of Rq∙f greater than 50 ms-1 may be caused by the generation of incoherent components that are not negligible in the measured signals. We can see in Figure 6 that the amplitude decreases markedly when Rq∙f is less than 100 ms-1. Since the similar result as shown in Figure 6 is also obtained for a different specular reflection angle, such as 30° [22], the selection of the incident angle could be an insignificant factor for roughness measurement from coherent component in this work.
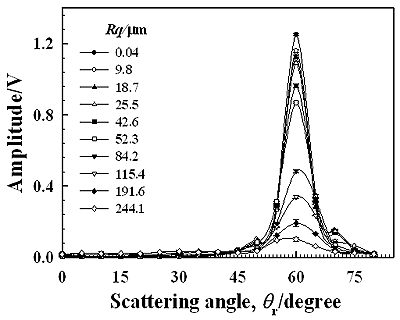
Figure 4. Change in the amplitudes with the scattering angles for different roughness Rq.
(a)
(b)
Figure 5. The waveforms (a) and their frequency spectra (b) of the coherent component reflected from the specimens having different roughness Rq (θi=θr=60°).
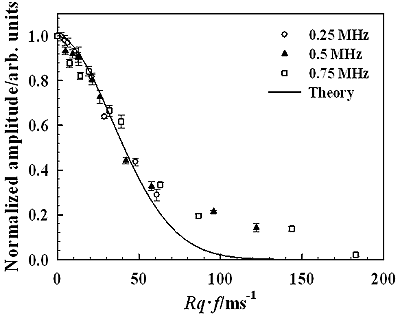
Figure 6. The relationship between the amplitude and the normalized roughness Rq∙f (θi=θr =60°).
For non-specular reflection angles, such as <50° or >70° shown in Figure 4, it is considered that there are no more coherent components and only incoherent components exist. Since the incoherent component is scattered into various directions under the condition of out-of-phase, the amplitude of the component is quite small compared with that of coherent component. Figure 7 shows the waveforms measured at the scattering angle of 30° for each specimen. We can see that the changes in the waveforms with Rq are quite different from those of the coherent components shown in Figure 5(a). Since the amplitude increases with Rq and the waveforms do not remain regular during the amplitude change, the incoherent components are dominant in measured waves for the angle of 30°. It can be seen from equation (3) that the amplitude of incoherent component depends not only on Rq but also on surface correlation length λo. Understanding the influence of both Rq and λo on the amplitude of incoherent component is therefore an important aspect for evaluating surface roughness from the scattered wave. Figure 8 shows the variations of the amplitude calculated from equation (3) as functions of Rq and λo for incident and scattering angles of 60° and 30°, respectively. The other parameters used for the calculation are the same as those used in the experiment mentioned above. It should be noted that the amplitude of incoherent component is very sensitive to both Rq and λo. It can be seen from Figure 8 that the surface correlation length λo can be estimated from the incoherent component when the Rq is known. Figure 9 shows the relationship between the λo and the amplitude of the incoherent component for each specimen, where the amplitude is normalized by dividing by the amplitude of the specimen having Rq=244.1 μm and the λo is measured using a stylus profilometer. The measured relationship between the amplitude and the λo almost agree with the theoretical result. A discrepancy between the experimental and theoretical results is found for specimens having Rq less than 52.3 μm. This is because the amplitude of the incoherent component is quite small for such small values of Rq and therefore it is considered to be comparable with the noise in measured signals. Such the noise creates the discrepancy between theoretical and experimental results.

Figure 8. The calculated amplitude distribution of the incoherent component as functions of roughness Rq and surface correlation length λo (θi=60°, θr=30°).
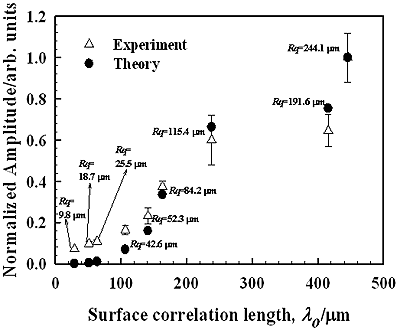
Figure 9. The relationship between the surface correlation length λo and the amplitude of the incoherent component (θi=60°, θr=30°).
The measured results show that air-coupled ultrasound is feasible for noncontact measurement of relatively large range of roughnesses, such as up to 50 μm or more, where the optics can not be applied. For establishing the proposed surface profile evaluation technique, further study on the sensitivity and the measurement error should be conducted.
Conclusions
We have performed a noncontact characterization of surface profile using air-coupled ultrasound with broadband capacitance transducers having a center frequency of 0.5 MHz. The specimens with statistical parameters of root-mean-square roughness Rq and surface correlation length λo, ranging from 0.04 to 244 μm and from 29 to 445 μm, respectively, were used. The relationships between the scattered wave and both parameters Rq and λο have been examined. It has been shown experimentally that the behaviors of the incoherent component of the scattered wave with the surface roughness are quite different from those of the coherent component.
The measured relationship between the amplitude of the incoherent component and the parameters of Rq and λο has been obtained and verified using the Kirchhoff-based scattering model. Since the amplitude of the incoherent component depends on both Rq and λο, it has been shown that it can be possible to estimate λo from the amplitude of the incoherent component when the value of Rq is known.
Acknowledgements
The financial supports from Grant-In-Aid for Scientific Researches (B17360351) by JSPS and the 21st Century Centers of Excellence (COE) Program of the Ministry of Education, Culture, Sports, Science and Technology are gratefully appreciated.
References
1. Q. Tao, H. P. Lee and S. P. Lim, “Contact Mechanics of Surfaces with Various Models of Roughness Description”, Wear, Vol. 249, 539-545, 2001.
2. C. Li, G. W. Kattawar and P. Yang, “Effect of Surface Roughness on Light Scattering by Small Particles”, J. Quantitative Spectroscopy & Rad. Transfer, Vol. 89, 123-131, 2004.
3. D. J. Whitehouse, “Surface Metrology”, Meas. Sci. Technol., Vol. 8, 955-972, 1997.
4. K. Mitsui, “In-process Sensors for Surface Roughness and Their Applications”, Precision Eng., Vol. 8, 212-220, 1986.
5. J. M. Bennet, “Recent Developments in Surface Roughness Characterization”, Meas. Sci. Technol., Vol. 3, 1119-1127, 1992.
6. T. V. Vorburger, E. Marx and T. R. Lettieri, “Regime of Surface Roughness Measurable with Light Scattering”, Appl. Opt., Vol. 32, 3401-3408, 1993.
7. J. A. Ogilvy, “Theory of Scattering from Random Rough Surfaces”, IOP, Bristol (1991) 32.
8. Y. C. Shin, S. J. Oh and S. A. Cokker, “Surface Roughness Measurement by Ultrasonic Sensing for in-Process Monitoring”, J. Eng. for Indust., Vol. 117, 439-447, 1995.
9. G. V. Blessing, J. A. Slowinski, D. G. Eitzen and H. M. Ryan, “Ultrasonic Measurements of Surface Roughness”, Appl. Opt., Vol. 32, 3433-3437, 1993.
10. S. J. Oh, Y. C. Shin and E. S. Furgason, “Surface Roughness Evaluation via Ultrasonic Scattering”, IEEE Trans. UFFC, Vol. 41, 863-871, 1994.
11. M. deBilly, F. C. Tenoudji, G. Quentin, K. Lewis and L. Adler, “Ultrasonic Evaluation of Geometrical and Surface Parameters of Rough Defects in Solids”, J. Nondestructive Eval., Vol. 1, 249-261, 1980.
12. P. C. Pedersen and A. Grebe, “Application of Time Delay Spectrometry for Rough Surface Characterization”, Ultrasonics, Vol. 39, 101-108, 2001.
13. J. E. Wilhjelm, P. C. Pedersen and S. M. Jacobsen, “The Influence of Roughness, Angle, Range, and Transducer Type on the Echo Signal from Planar Interfaces”, IEEE Trans. UFFC, Vol. 48, 511-521, 2001.
14. M. de Billy, F. C. Tenoudji, A. Jungman and G. J. Quentin, “The Possibility of Assigning a Signature to Rough Surface Using Ultrasonic Backscattering Diagram”, IEEE Trans. UFFC, Vol. 23, 356-363, 1976.
15. P. F. Smith and M. A. Player, “Enhanced Surface Parametrization Using Maxium Entropy Signal Processing of Ultrasonic Pulses”, Meas. Sci. Technol., 2 (1991) 419-429.
16. H. Nagahara, T. Hashida, M. Suzuki and M. Hashimoto, “Development of High-Sensitivity Ultrasonic Transducer in Air with Nanofoam Material”, Jpn. J. Appl. Phys., Vol. 44, 4485-4489, 2005.
17. D. W. Schindel, D. A. Hutchins, L. Zou and M. Sayer, “The Design and Characterization of Micromachined Air-coupled Capacitance Transducers”, IEEE Trans. UFFC, Vol. 42, 42-51, 1995.
18. D. A. Hutchins, D. W. Schindel, A. G. Bashford and W. M. D. Wright, “Advances in Ultrasonic Electrostatic Transduction”, Ultrasonics, Vol. 36, 1-6, 1998.
19. K. Sasaki, M. Nishihara and K. Imano, “Nanometer-Order Resolution Displacement Measurement System by Air-Coupled Ultrasonic Wave Introducing Maximum Phase-Sensitivity Tuning”, Jpn. J. Appl. Phys., Vol. 44, 4411-4416, 2005.
20. R. Stoessel, N. Krohn, K. Pfleiderer and G. Busse, “Air-Coupled Ultrasound Inspection for Various Materials”, Ultrasonics, Vol. 40, 159-163, 2002.
21. D. W. Schindel and D. A. Hutchins, “Applications of Micromachined Capacitance Transducers in Air-Coupled Ultrasonics and Nondestructive Evaluation”, IEEE Trans. UFFC, Vol. 42, 51-58, 1995.
22. D. D. Sukmana and I. Ihara, “Application of Air-Coupled Ultrasound to Noncontact Surface Roughness Evaluation”, Jpn. J. Appl. Phys., Vol. 44, 4417-4420, 2005.
23. Ref. 7) pp. 88-89.
24. H. Takafuji, T. Ishida and R. Kusaka, “A New Quantitative Representation of Surface Roughness and Its Application to the Analysis of Light Scattering from Steel Sheet Surfaces”, Trans. ISIJ, Vol. 62, 75-83, 1976, (in Japanese).
25. Ref. 7) p. 13.
26. D. J. Whitehouse, “Handbook of Surface Metrology”, Institute of Physics Publishing, London (1994) p.15 & p. 53.
Contact Details
|
|
Deden Dian Sukmana* and Ikuo Ihara
Nagaoka University of Technology, Department of Mechanical Engineering
Nagaoka, 940-2188
Japan
*E-mail: [email protected]
|
|
T This paper was also published in “Advances in Technology of Materials and Materials Processing Journal, 8[2] (2006) 248-255”.
|
|