Sensor-Arm Extensometers
Sensor-arm extensometers are used for performing compression, tensile, cyclic, and flexure tests. It is feasible to infinitely adjust the gage length to be suitable to the specimen to be tested. Digital measuring systems are used in the sensor-arm extensometers from Zwick.
The extension is transmitted to the measurement system through play-free, swiveling knife edges equipped on the sensor arms. Specimen damage can be prevented and the precise location of the knife edges can be ensured since the sensor-arm clamping forces are negligible and adjustable steplessly.
Interchangeable Sensor Arms
Since the sensor arms can be easily changed, it would be possible to accommodate different types of material, test, and specimen shape (Figure 1). Through a plug-in connection, the sensor arms can be easily and quickly mounted for compression, tensile, or flexure tests, as well as for use in temperature chambers, thus reducing set-up and changeover times.
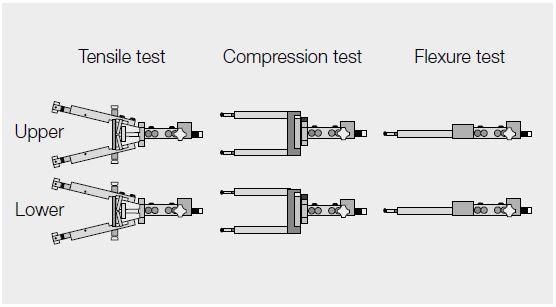
Figure 1. The various types of sensor arms cover a wide range of applications
Interchangeable Knife Edges
It is also possible to change the knife edges, which include one convex side and one flat side. They can be always held in single-point contact with the specimen (round or flat specimen, Figure 2) by simply rotating, thereby guaranteeing extremely precise measurements.
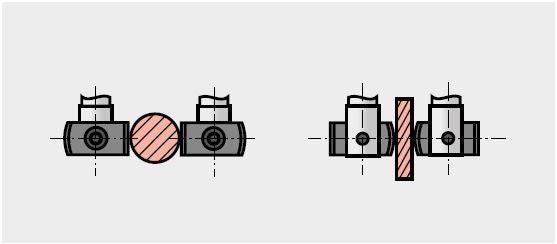
Figure 2. Round and flat specimens with straight and convex knife edges, respectively
For notch-sensitive specimens, knife edges come with a Vulkollan coating, and for extremely smooth specimens, they come with an aluminum oxide coating.
Tests up to Specimen Break
Since the knife edges have the ability to swivel through 180° (Figure 3) and transmit very low forces to the sensor arms at specimen break, they reliably prevent damage to the sensor arms and thus the extensometer at specimen break.
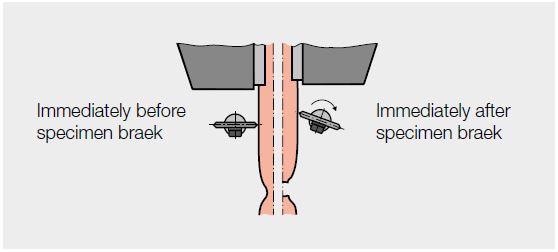
Figure 3. Operating principle of swiveling knife edges
Applications in Temperature Chambers
Thanks to the extended sensor arms, the extensometers can be used in temperature chambers for extension measurement. Since the arms enter the temperature chamber via lateral apertures in the chamber wall, they preserve ease of operation and full functional capability.
High Level of Automation
Based on the extensometer used, it is possible to automate the extension measurement to a greater degree. This includes not just the automatic modification of the initial gage length, including cross-section-related gage length, but also the application and removal of the sensor arms, thereby offering a higher degree of reproducibility and accuracy and reducing the test times.
multiXtens®
Range of Application
multiXtens is a high-accuracy, all-round extensometer that is best suited to compression, tensile, cyclic, and flexure tests on metals, plastics, rigid foams, composites, elastomers, and various other materials.
The combination of very large measurement range and the exceptionally high measurement accuracy renders multiXtens (Figure 4) the perfect tool for different requirements (for example, testing elastomers and plastics or metals and plastics).
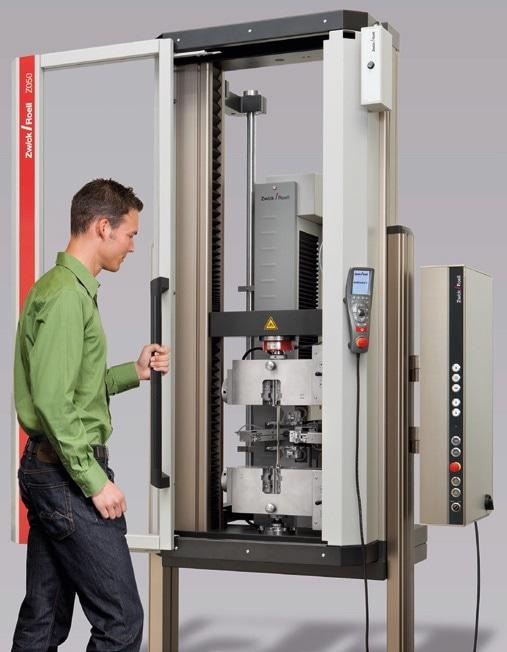
Figure 4. multiXtens universal extensometer
Description of System
Thanks to its absolutely modular design, this multi-purpose extensometer can be used in a broad array of testing conditions. It is equipped with a guide system including integrated measuring carriages that can be moved independently of each other. Measuring heads that can be easily exchanged and sensor arms are attached to these measuring carriages (Figure 5). All components are identified automatically.
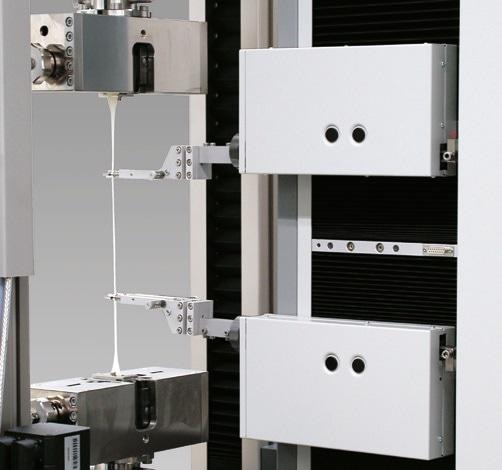
Figure 5. The easy-change sensor arms are attached to the carriage-mounted measuring heads.
Advantages/Features
- Extreme precision, even in the case of long measurement paths of up to 700 mm
- Ability to be used up to specimen break, even under high forces and with brittle specimen material
- multiXtens is calibrated from measurement travel of 20 μm in Class 0.5
- By changing the sensor arms, flexure and compression tests can be carried out in a simple manner
- Accuracy Class 0.5 based on ISO 9513
- Freely adjustable sensor-arm contact pressure and extremely low drag force allow reliable, safe, and traceable testing of sensitive specimens
- Maximum error of ±1 μm in the measurement of differential movement between two measuring points in the range of 20–200 μm, thus completely fulfilling the additional requirement to ISO 527-1 (2011)
- Completely automatic system:
- Centering of measuring slide
- Measuring clearance between specimen grips
- Automatic setting of gage length
- Automatic application and withdrawal of sensor arms
Options
- Fine-strain extensometer
- Mechanical and video transverse strain extensometers (for instance, to determine Poisson’s ratio or r-value)
- Precision swivel unit
makroXtens®
Range of Application
The makroXtens is a multi-purpose, high-accuracy extensometer that operates based on the contact principle. It is best suited for compression, tensile, cyclic, and flexure tests on plastics, metals, composites and various other materials.
Description of System
Thanks to the modular design of this versatile extensometer, the manually operated version, for instance, can be upgraded to automatic attachment and removal.
Types
The makroXtens comes as a P variant and an HP variant, where each variant has three different gage length ranges. The HP variant can be differentiated by its intelligent tracking unit, higher resolutions, and the release for “closed loop” strain control compliant with ISO 6892-1 method A(1) plus ASTM E 8-09 method B.
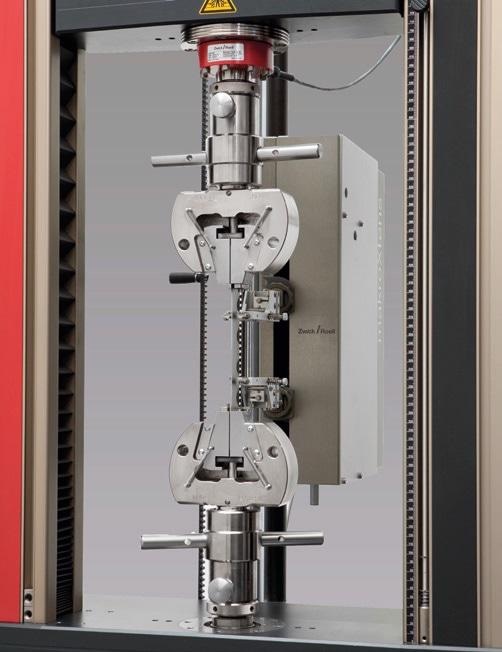
Figure 6. makroXtens
Optional Transverse Strain Extensometers
The optional transverse strain extensometers have been designed to perform tensile tests on metals. By mounting on the makroXtens, these extensometers can be manually or automatically operated as per the requirements through the testXpert® II testing software. It is possible to measure the transverse strain in one, two, or four cross-sectional planes.
The videoXtens transverse strain extensometer for high-resolution, non-contact measurement of the transverse strain is a unique product from Zwick, offering an excellent system that combines optical and tactile strain measurement.
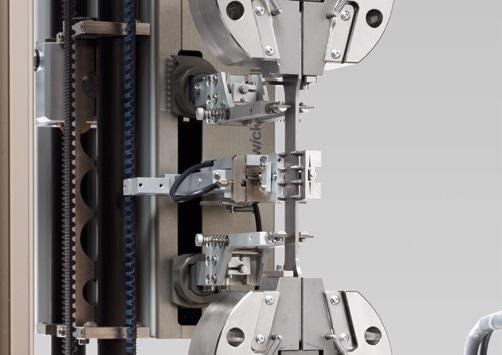
Figure 7. makroXtens in combination with transverse strain extensometer (4 measurement lines).
Advantages/Features
- Powerful measuring system that can be ideally used in automated testing systems
- Standard extensometer used in the automotive, metals, and plastics industries, with an installed base of more than 2500 systems
- Maximum error of ±1 μm in the measurement of differential movement between two measuring points in the range of 20–200 μm, thus fully satisfying the additional requirement to ISO 527-1 (2011)
- Ability to be used up to specimen break, even with brittle specimen material and under high forces
- Flexure and compression tests can be carried out in a simple manner by changing the sensor arms
- Accuracy Class 0.5 based on ISO 9513
- The measuring system is guided automatically into the ideal position between the specimen grips. Maximum measurement travel is always available.
- makroXtens is calibrated from measurement travel of 20 μm in Class 0.5

This information has been sourced, reviewed and adapted from materials provided by ZwickRoell GmbH Co. KG.
For more information on this source, please visit ZwickRoell GmbH Co. KG