Sheet metal forming operations can vary greatly in their processes. From simple bending to stretching to deep drawing of complex parts, sheet metal forming operations may take many forms.

Image Credit: Admet, Inc. - Materials Testing Equipment
The formability of the sheet material is largely determined by the mechanical properties of the sheet material, which thus indicates the amount of deformation that the material can withstand before fracture. This article outlines vital definitions needed in the determining sheet metal characteristics, as well as the test method and equipment, which is used in their identification.
It is important to determine the extent to which a material can deform in order to design a reproducible forming operation. It is also vital to test the incoming sheet material given the fact that material properties can vary from coil to coil, and therefore alter the part quality and scrap rate.
Definitions
Both process variables, such as strain, strain rate, and temperature, as well as material characteristics, are factors affecting the outcome of a forming process. One test cannot be used to predict the formability of materials in all situations, given that stress and strain fields are so diverse during this forming process. Despite this, it is necessary to gather an understanding of the material in order to determine how successful a forming process is.
Formability and product quality are affected by material properties, either directly or indirectly, including the following:
- Young’s Modulus
- Ductility
- Plastic Strain Ratio
- Strain Hardening Exponent
- Ultimate Tensile Strength
- Yield Strength
Neither Ultimate Tensile Strength nor Yield Strength is directly related to formability. However, the closer the magnitude of the two stresses is, the more work hardened the metal is. A metal that is work hardened has lower ductility, reducing its ability to stretch.
During the forming process, both plastic and elastic deformation occurs. The internal elastic stresses relax upon the removal of the external forces. The “springback” or stress relaxation will cause the part to distort or alter shape if the forming process is not designed properly. A material will exhibit greater “springback” or shape alteration with a lower value for Young’s Modulus, E, and/ or a higher value for Yield Strength.
Ductility refers to the ability of a material to deform plastically before it undergoes fracturing. Total Elongation and Reduction of Area are two measures of ductility governed by ASTM E8/E8M.
The amount of uniaxial strain at fracture is termed Total Elongation, and is depicted as strain at point Z. Total Elongation includes both plastic and elastic deformation and is widely referred to as Percent Elongation at Break (The result is reported with the gauge length used for measurement).
Measuring the cross-sectional area at the fracture point is how the Reduction of Area is calculated and is commonly expressed as a percent value.
The Strain Hardening Exponent, n, is the measure of how quickly a metal gains strength and hardness thanks to plastic deformation. After an applied load is removed, the deformation remaining is called plastic deformation. The determination of the Strain Hardening Exponent is governed by ASTM E646, which is a tensile test designed to measure the stress-strain response in the plastic region. The graph below demonstrates the plastic region, shown between point B, Yield Strength, and point D, Ultimate Strength. Selecting five data pairs between the two points is how the n value is calculated.
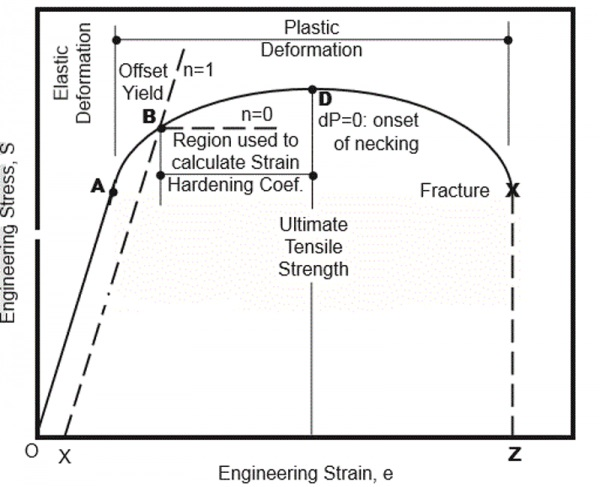
Image Credit: Admet, Inc. - Materials Testing Equipment
The higher that the value of n is, the more piece of material can be stretched before necking. Phrased in an alternative way, this means that the material can be stretched further before failure with the greater the value of n, as it signifies the greater difference between Yield and Ultimate.
The ability of the sheet metal to resist thinning or thickening, for instance, when being deep drawn into a cup, is indicated by the Plastic Strain Ratio, r. This r value is determined from longitudinal strain and width and is a measure of sheet metal drawability. ASTM E517 Standard Test Method for Plastic Strain Ratio r for Sheet Metal decides its determination. The r value of sheet varies with the applied axial strain and, as such, should be reported at the tested strain level, unlike many other materials with r values that stay constant over the range of plastic strains.
Tips for Sheet Metal Testing
- The characteristic properties of sheet metals are measured by the standard tensile test. The simple bend test, limited dome height test, cup test, hole expansion test, or wrinkling test, as well as other, more specialized tests, may be performed to simulate straining conditions found during the actual process.
- In sheet metal testing, strain-rate sensitivity or speed of testing is vital. At higher strain rates, the strength properties of materials increase. ASTM E8 specifies a lower and upper limit on deformation rates based on stress rate, strain rate, or crosshead separation. The strain rate variation allowed in E8 may result in Yield Strength variations up to 20%, with some metals, and variations like ductility and the strain hardening exponent may also occur. As a result, a constant and valid strain rate must be used to compare similar tensile tests.
- Data pairs should be selected from a continuous portion of the plastic region on a stress-strain curve for proper n value calculations. However, if there is a discontinuity, it is imperative to select a portion of the curve that is continuous or otherwise discard the test.
- One of the more difficult formability parameters to measure is Plastic Strain Ratio, due to the additional width strain measurement. It is possible that R value errors as large as 40-50% can occur due to errors linked to measuring width strain. It is paramount to undertake a careful and rigorous inspection of the specimen after each test, to check for curling, and to ensure the correct use of proper extensometer knife edges to obtain accurate r values.
Recommended Equipment
Universal Testing Machine
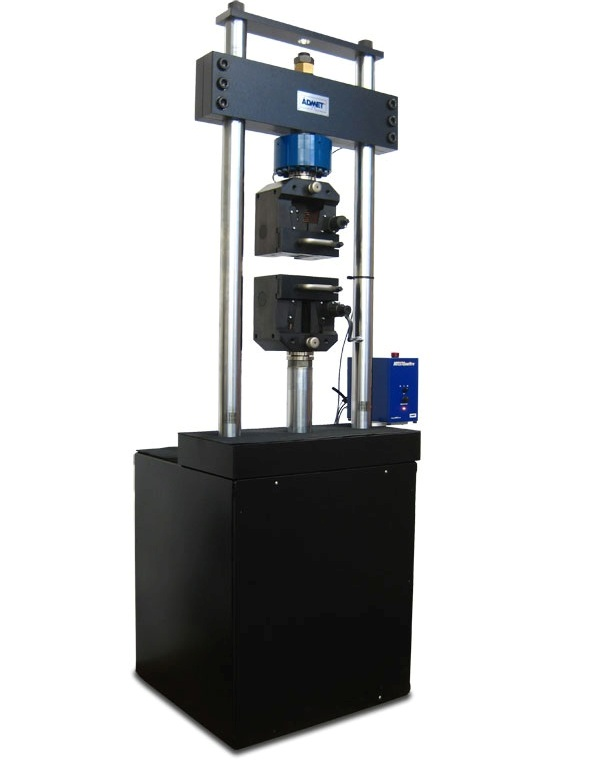
Image Credit: Admet, Inc. - Materials Testing Equipment
Electromechanical Design
These eXpert 2600 series universal testing machines are available in our range in either tabletop or floor standing configurations from 2kN to 600kN. The conventional configuration for this dual column electromechanical UTM for testing the mechanical properties of metals incorporates wedge grips, MTEST Quattro, and an extensometer.
Servohydraulic Design
In high capacity tests, which are both dynamic and static, these servo-hydraulic eXpert 1000 series machines are immensely competitive on price. In contrast to various existing designs on the market, ADMET servo-hydraulic system frames are integrated with integral power supply and electronics, which saves valuable lab space. eXpert 1600 systems are static servohydraulic machines, whereas the eXpert 1900 systems are configured for dynamic testing.
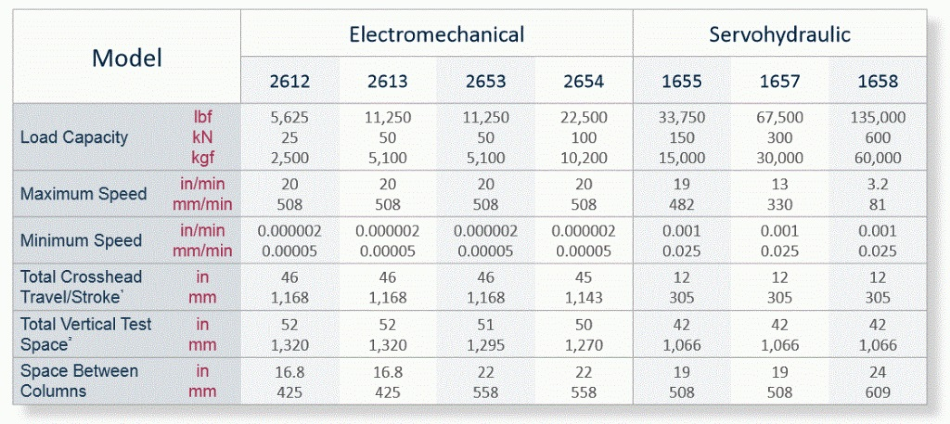
The table below depicts a comparison of the eXpert 2600 and eXpert 1600 machine frames. Please note that there are further force capacities also available.
Tabel 1. Source: Admet, Inc. - Materials Testing Equipment
Controller and Software
The MTESTQuattro controller by ADMET is a closed-loop servocontrol technology which has an industry-leading 1,000 Hz data acquisition rate. eXpert 2600 and eXpert 1600 systems for metals testing also come with the MTESTQuattro controller and software pre-programmed with ASTM Standards such as ASTM E8, A370, and E111. These systems are designed for the metals industry and therefore allow automatic calculation of key parameters such as Peak Load, Ultimate Tensile Strength, Offset Yield, R-Value, N-Value. Additionally, video extensometers and external data acquisition can be used in conjunction with MTESTQuattro via shared file access.
Accessories
Grips
Wedge grips are included in the most common grip setup for sheet metals testing. These tools can be supplied with serrated jaws for flat specimens, as well as v-jaws for round specimens, and can be used at high forces. Wedge grips can come with handle extrusions (GW-10T), a retaining knob, or a door (GW-XT) that has to be closed after the tensile specimen is secured in the jaw faces, depending on the model selected. ADMET also offers moving body wedge grips (GW-527), which means the user can avoid applying compressive loads on the samples, as well as wedge grips, which are designed for installation in environmental chambers for high-temperature testing (GW-T-T).
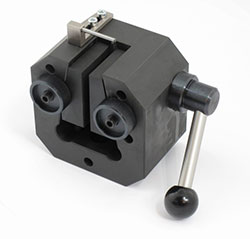
Image Credit: Admet, Inc. - Materials Testing Equipment
Extensometers
Sheet metal testing may require an axial and a transverse extensometer, depending on the properties that need to be calculated. The setup for plastic strain ratio, r-value, and calculations necessitates both the axial and the averaging transverse extensometers. For measuring width strains, the transverse extensometer knife edge profiles, shown on the left, should be ideal. However, for sheet metal specimens, pointed knife edges are not appropriate.
Environmental Chambers
In extreme heat or cold applications, many industries use metallic materials. As a result, an environmental chamber to house testing specimens may be required in sheet metal testing. ADMET provides environmental chambers that can be set to both low-temperature testing (LN2) and high-temperature testing. Environmental chambers are provided with their own temperature controller, and the recordings and temperature settings can also be controlled with MTESTQuattro software.
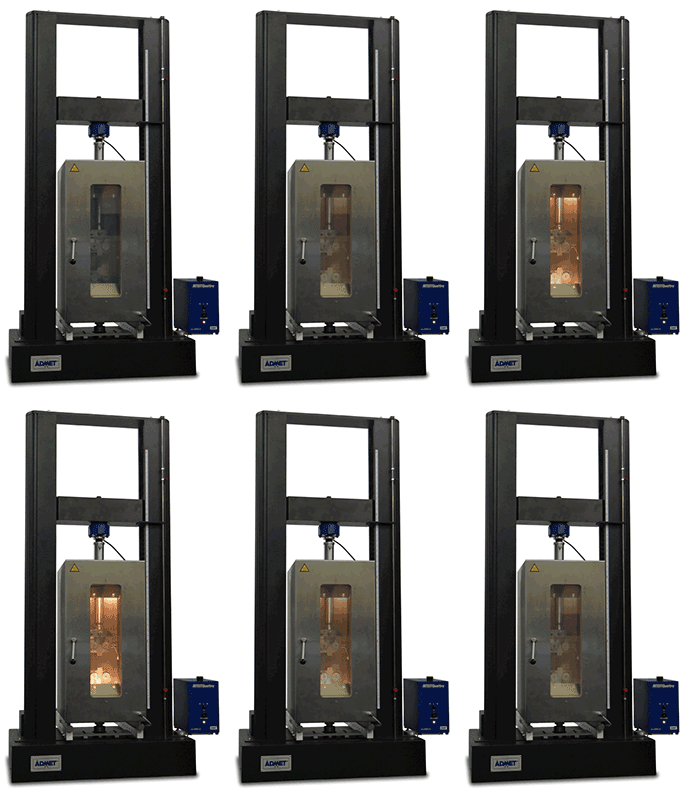
Image Credit: Admet, Inc. - Materials Testing Equipment
This information has been sourced, reviewed and adapted from materials provided by Admet, Inc. - Materials Testing Equipment.
For more information on this source, please visit Admet, Inc. - Materials Testing Equipment.