Many automotive OEMs are prioritizing lightweighting as part of their adherence to precise emission and engine efficiency guidelines. Large iron engines and components are increasingly being replaced with aluminum and other lightweight alloys, capable of matching the strength of iron with no adverse weight implications.
Cutting-edge optical metrology tools are central to the efficient manufacture of a wide range of lightweighted engine components.
Many initiatives have taken place in recent years, aiming to reduce vehicle emissions while increasing overall efficiency. The automotive sector has had to shift significant resources to better optimizing engine performance, either due to concerns around climate change or helping to safeguard economies against fluctuating fuel costs or potential fuel shortages.
The race is on to make vehicles significantly more efficient while simultaneously preserving enough attractiveness and functionality to stimulate profitability and sales.
Thermal Barrier Coatings
Automotive OEMs are focused on efficiency, aiming to reduce weight while enhancing engine performance efficiency. One central goal is replacing the cast-iron cylinder liners utilized in aluminum cylinder blocks with lighter-weight materials that are more thermally efficient.
A range of potential alternative solutions and materials exist and these must be scuff- and wear-resistant while possessing a low friction coefficient. One such solution is thermal barrier coatings (TBCs).
TBCs are currently the solution of choice for various automotive OEMs, essentially coating cast aluminum block bores with a spray of wear-resistant, composite or ceramic material.
This material hardens, forming a thinner surface -relative to a liner- in the aluminum cylinder. Currently, the most commercially viable TBCs are applied via the plasma spray process, which is able to yield superior wear resistance than iron. This allows aluminum alloy engines to employ robust tribological materials, despite the harsh environments found within most combustion chambers.
The spray-coating process does have some issues, however, and these issues require the application of rigorous quality measuring protocols and management procedures. For instance, a splatter morphology can occur due to the high velocity with which the coating is applied to the cylinder wall, potentially leading to inconsistent coating.
Surface Metrology
Coating properties such as micro-hardness, porosity, thickness, strength and adhesion are all essential metrics in assessing the coating’s viability. These metrics are critical tools for ascertaining which process parameters may need to be altered before an optimum coating can be achieved.1
Non-deterministic porosity distribution across the cylinder’s surface following spraying necessitates the use of a metrology technology that can accurately, reliably, and repeatably measure the three phases necessary in producing a finished lined cylinder: mechanical activation thermal spray application post-spray finishing
Furthermore, any metrology solution employed in assessing a spray-lined cylinder’s surface characteristics should be capable of taking highly accurate measurements at each of the three process phases, with each stage transitioning from very rough to very smooth.
A dynamic range of surface textures like the one outlined above requires a robust metrology solution. ZYGO’s coherence scanning interferometry (CSI) technology can capture data relating to a diverse array of textures and surface heights and this technology is available in ZYGO’s full range of 3D optical profilers.
3D Optical Profilers
CSI broadens the application of interferometric techniques to surfaces that exhibit complexities in terms of steps, roughness, structure and discontinuities. Further benefits also include the equivalent of autofocus at each point in the field of view, suppressing any false interference resulting from scattered light.
CSI technology is at the core of ZYGO’s 3D optical profilers, providing sub-nanometer height precision at all magnifications, alongside thorough analysis of a broader range of surfaces, ranging from rough to super-smooth, including steep slopes, thin films, and large steps.
Measurements can be taken more rapidly and more precisely than with other commercially available technologies, making CSI ideally suited to applications such as the spray-lined cylinder application outlined in the examples here.
Alternative technologies like fax film involve affixing a thin sheet of plastic to the cylinder surface before a solvent is applied to soften and conform the sheet to the surface. Once the sheet is removed and has been sufficiently hardened, a microscope is used to inspect it manually. Though this method is commonly used, it is messy and can lead to highly subjective results.
ZYGO’s CSI 3D optical profilers are non-contact, therefore removing any danger of surface integrity being inadvertently compromised. This is especially important when considering metrology demands linked to the analysis of cylinder spray-coating.
CSI technology also provides the highest vertical resolution measurement agnostic of the interferometric objective. Other optical measurement technologies may underperform when the surface texture is comparatively smooth; for example, focus variation technologies may require some level of texture on the surface in order to successfully resolve the surface.
ZYGO’s Mx™ software offers full system control and data analysis, including intuitive navigation, quantitative topography data, interactive 3D maps, built-in statistical process control (SPC), pass/fail limits and control charting.
These advanced features allow hundreds of parameters to be reported while measuring texture and surface structure across various surface scales, including 2D profile standard compliance to ISO 4287/4288 and areal surface roughness to ISO 25178 standards.
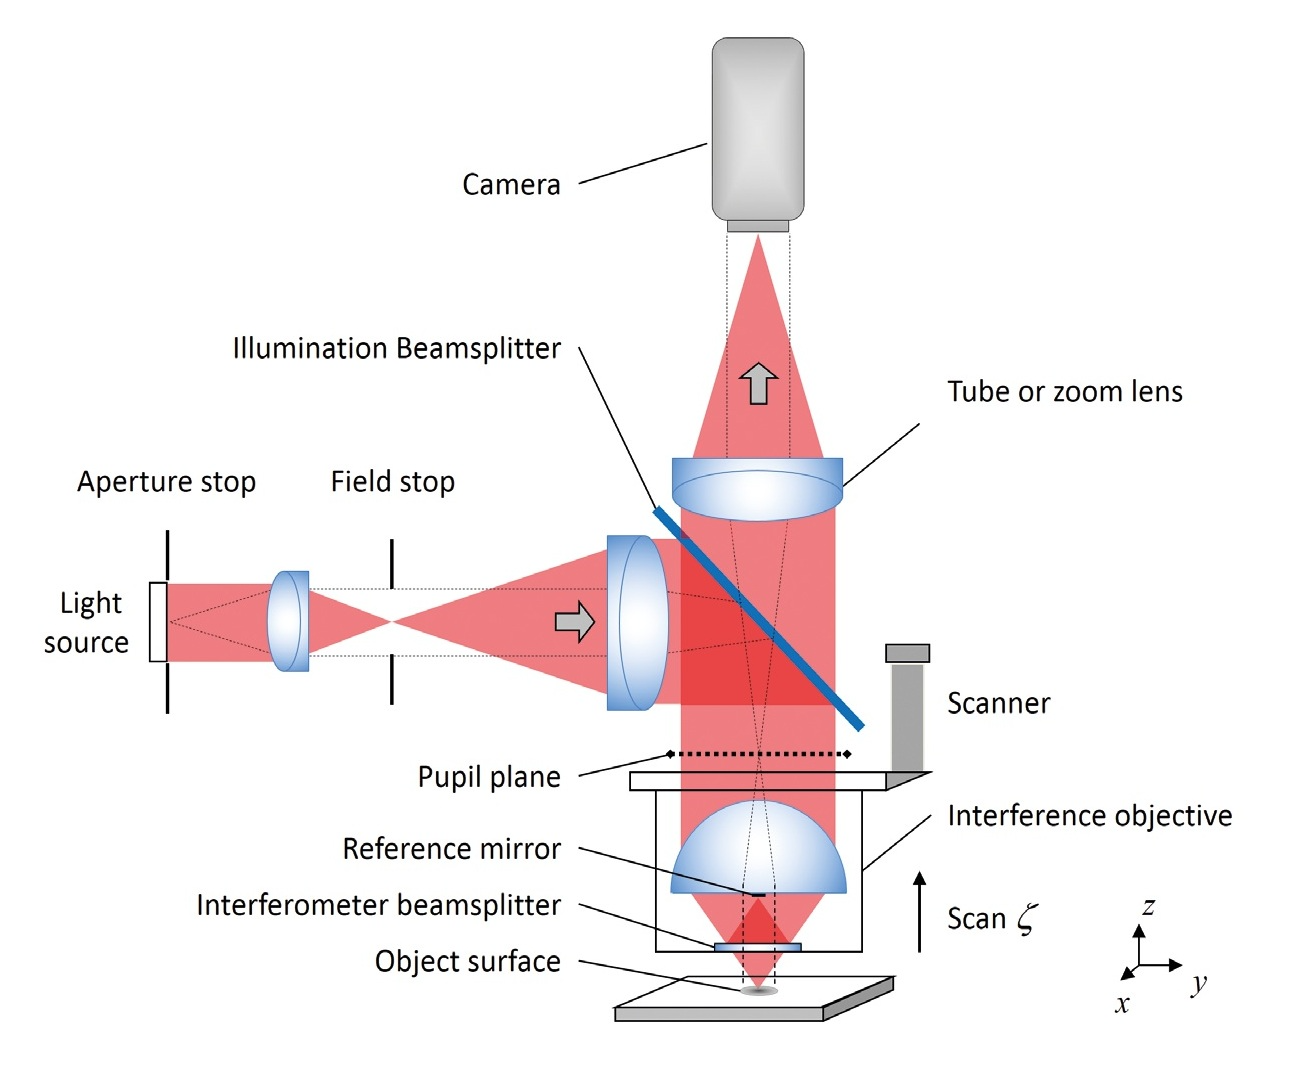
Typical set-up for coherence scanning interferometry; see the text for explanation. Image Credit: Zygo Corporation
Spray-lined Cylinder Application
Mechanical Activation
The mechanical activation and pre-coating stage of the process requires scoring of the cylinder walls (Figure 2). This process must be strictly controlled because it determines the amount of TBC applied.
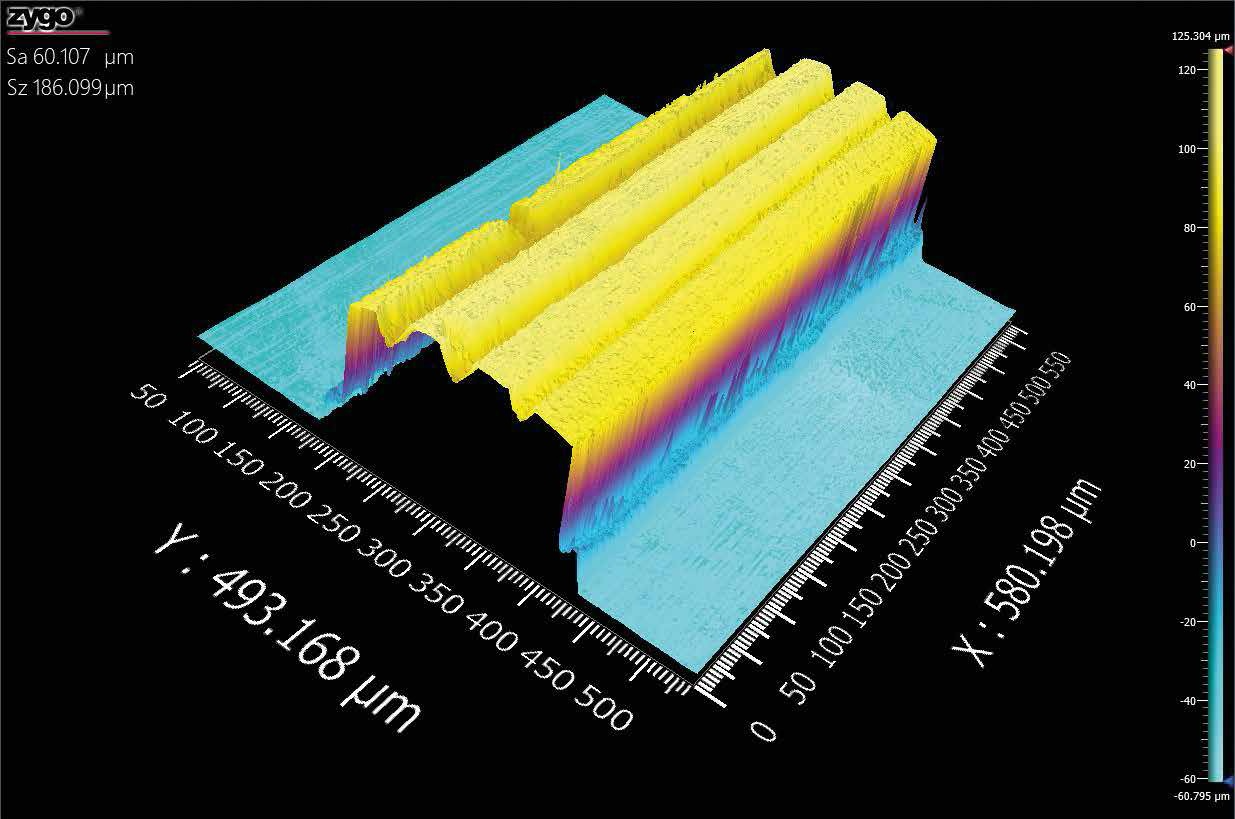
CSI scan of the mechanically activated surface that will provide the anchor for the thermal barrier coating to adhere to the cylinder wall surface. The height scale runs from –60 to +125 μm. Image Credit: Zygo Corporation
If the application is too thin, the TBC could flake off. If the application is too thick, however, the honing process could remove peaks containing the TBC. Either of these scenarios could potentially compromise the cylinder coating process’s quality and efficiency.
For these types of step-height-type measurements, the extended scan capabilities of Zygo’s CSI technology enables its optical profilers to rapidly, repeatably and accurately measure structures higher than 250 µm.
Thermal Spray Application
After the TBC has been applied, automotive OEMs must assess how well pores have developed (Figure 3). Pore sizes can range from 50 μm2 to over 1 mm2 and these will help determine how well this newly sprayed surface retains lubricity.
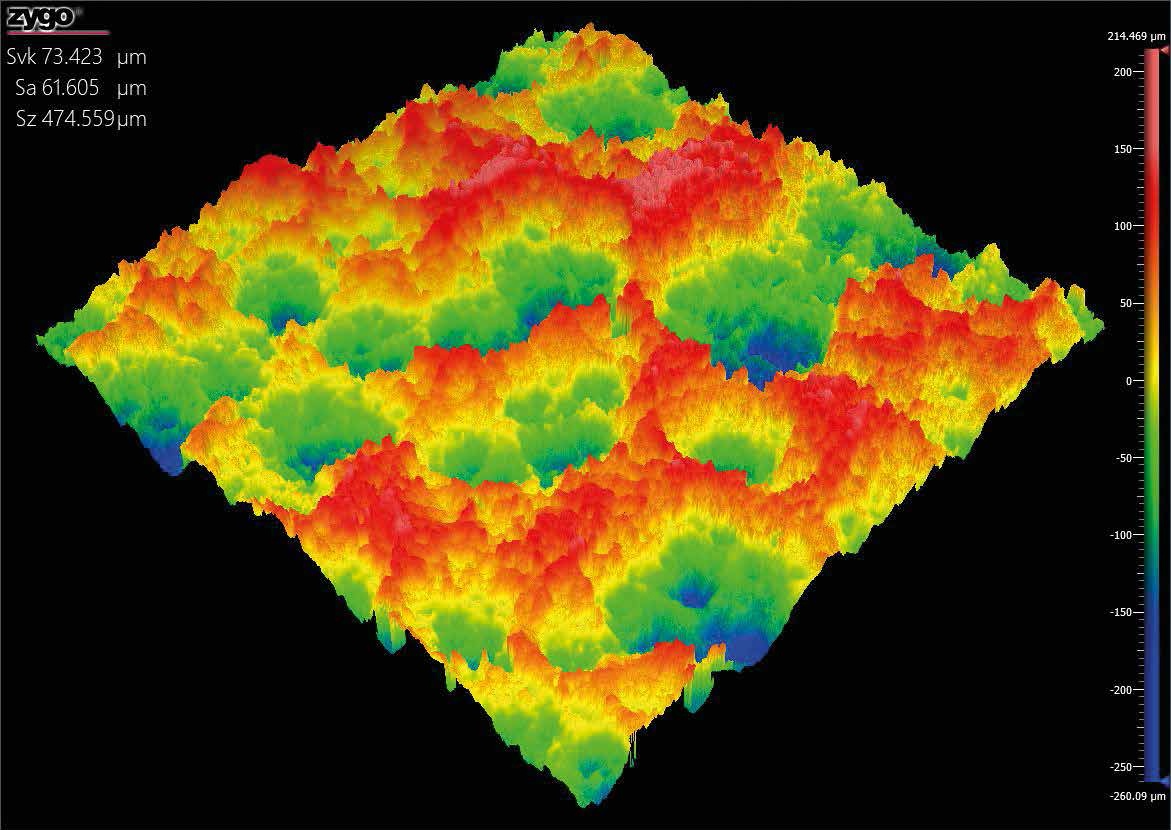
Measurements of the dark, rough features after the TBC application can provide process engineers information on the formation and distribution of surface porosity. The height scale runs from –260 to +214 μm, the XY dimensions are approx. 1 mm x 1 mm. Image Credit: Zygo Corporation
Pre-honed coatings like these are generally very rough with low reflectivity, meaning that typical CSI systems will struggle to acquire data from the surface. Thankfully ZYGO’s implementation of CSI allows these types of surfaces to be measured with ease, producing consistent metrics for process engineers.
Post Spray Finishing
Finally, the finished surface texture (figure 4) of the cylinder post-spraying should be analyzed, checking crosshatch (a textured pattern on a cylinder wall that is used to retain oil, ensuring proper lubrication of the piston rings and cylinder), as well as final porosity (including pore density, pore volume by area, and any change of pore size by cylinder depth).
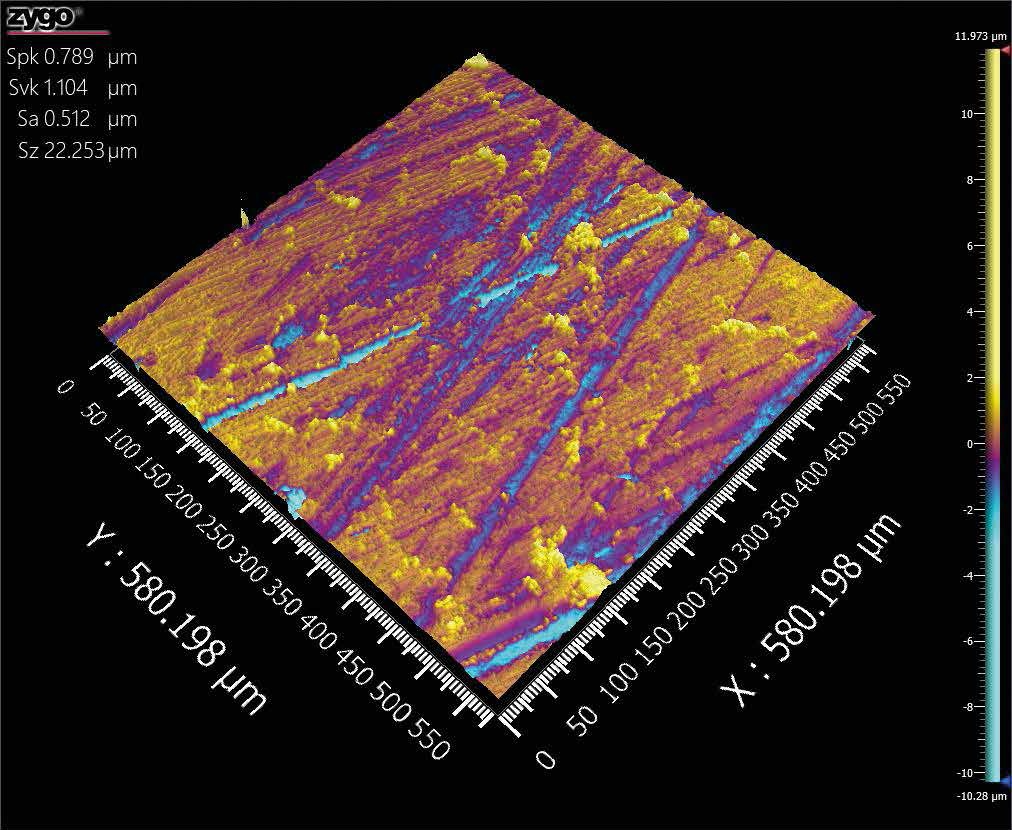
Honing generates the proper stratified surface for the sliding ring/cylinder interface. Quantifying the lubricity by direct measurement of porosity will assist with honing process control. The height scale runs from –10 to +12 μm. Image Credit: Zygo Corporation
In Conclusion
ZYGO’s CSI-based optical profiler systems can accommodate a wide, dynamic range of measurements, from the very rough surface measurement of pre-honing to the final assessment of exceptionally smooth honed surfaces.
The development of highly specialized hardware and software improvements has substantially improved this capability, facilitating measurement of previously inaccessible super-polished surfaces and steep surfaces with a single metrology solution.
Reference
- Robinson, D., Ramsunder, P., and Samantaray, C., “Analyzing Porosity in Thermal Barrier Coatings: Edge Detection of Images using MATLAB,” 121st ASEE Annual Conference and Exposition, Indianapolis, IN, USA, 2014.
Acknowledgments
Produced from materials originally authored by Michael Schmidt at ZYGO.
This information has been sourced, reviewed and adapted from materials provided by Zygo Corporation.
For more information on this source, please visit Zygo Corporation.