Measuring super smooth surfaces generally necessitates the use of optical metrology tools, but it is important to note that optical solutions are not all the same. The choice of metrology solution for super smooth surfaces must be able to provide extreme precision, accuracy, and repeatability if it is to properly support quality and process control measures.
Super smooth surfaces are commonplace across a wide range of micro-electronic and optical applications, and product innovation is being driven in these industries by using surfaces to influence functional performance. Controlling, and therefore measuring, surface features has become increasingly vital as part of a shift towards miniaturization and precision engineering.
Surface texture requirements for advanced manufacturing processes continue to trend towards sub-nanometer levels, resulting in a multitude of new and distinct challenges for metrology tools, including increasing demands for highly efficient process control and quality.
Until very recently, standard approaches to such measurements involved the use of contact tools like atomic force microscopes (AFMs) or stylus profilometers. Unfortunately, these techniques are widely regarded as time-consuming and prone to damaging surfaces. They also require considerable operator training while offering comparatively low measurement point density.

Image Credit: Zygo Corporation
These issues can be addressed using non-contact optical metrology tools - the method of choice in measuring surface roughness of super smooth surfaces. Not all optical technologies provide the required level of repeatability and precision; however, so any supplier and technology must be carefully considered before decisions are made.
Non-Contact Optical Metrology Techniques
Common optical techniques utilized in surface measurements include focus variation, confocal microscopy, and coherence scanning interferometry (CSI).
Confocal Microscopy
Laser scanning and white light confocal microscopy observe a reflected light signal through a small aperture. Here, light is only received at the detector when the imaging system is in focus.
This method is valuable when rapidly producing 3D images of highly sloped or rough surfaces, but it is not as effective when attempting to measure smooth, featureless samples. Confocal scanning is only really practical for smooth surfaces at very high magnification, however, because its precision is contingent on the magnification of the microscope objective.
Focus Variation
Like confocal microscopy, this technique's precision is also reliant on the objective magnification employed. Focus variation's principle of operation is based on a beam of light being projected on a relatively small area of the surface of the assessed object. Analysis of the depth of field will determine the surface height, so to achieve this focus, variation analyzes a set of data points at the detector to ascertain a single height position. This leads to an inherent loss of lateral fidelity.
While focus variation is a relatively versatile technique, it cannot be used in instances where the surface being measured does not provide structure in the image; for example, very smooth glass or featureless wafers.
Coherence Scanning Interferometry
CSI employs the principle of optical interference to evaluate a part against a ‘perfect’ reference. Here, illumination is divided into two paths. One path travels to the reference surface, while the other path travels to the test surface.
Reflections from each surface combine at a detector, interfering with one another and creating a pattern of light and dark intensities. This interference pattern characterizes the test surface's topography.
CSI uses white light, which has a very short coherence length. This causes the interference signal to be is localized. This and only takes place when the test and reference legs are of equal length. CSI 'scans' the objective through focus, investigating the various heights present in the sample.
The scanning and localized interference involved in CSI allows the measurement of rough surfaces or structured surfaces with steps or other discontinuities, as well as surfaces that are extremely smooth.
CSI presents several other key advantages over confocal and confocal-like non-contact methods:
- It is highly precise, offering nanometer or sub-nanometer height precision at every magnification.
- It is a rapid, consistent measurement, generally producing ~1.9 million pixels in a matter of seconds, regardless of magnification.
- CSI can be used to measure optically transparent or super-smooth surfaces, as well as surfaces that have transparent optical films.
These benefits combine to offer excellent application versatility. CSI is also appropriate when working at low magnification or when working with large field-of-view imaging (< 5x) and higher magnification texture metrology. In each case, CSI delivers the same sub-nanometer level performance.
Best-In-Class CSI-Based Tools
It is important to note that not all CSI-based tools are the same, so users looking for a 3D optical metrology solution should select a tool based on its speed, wider magnification, superior Z-resolution, and the ability to measure both super-smooth and rough surfaces.
ZYGO Corporation is one of the world's foremost manufacturers of electromechanical devices and electronic instruments. The company has developed CSI-based solutions with hundreds of reportable parameters, ideal for measuring surface texture and structure across a range of surface scales, including 2D profile parameters compliant to ISO 4287/4288 and areal surface roughness to ISO 25178 standards.
ZYGO's CSI-based 3D optical profilers provide users with accurate, precise, and repeatable metrology tools. The company's latest series of 3D profilers includes a number of useful features, including SmartPSI, Smart Setup, and Non-Directional PSD, all of which are ideal for the manufacture of ultra-precise surfaces.
SmartPSI
ZYGO's SmartPSI technique integrates first class CSI and Phase Shifting Interferometry (PSI) to provide rapid, highly precise measurements characterized by the lowest possible measurement noise. This technique also integrates automatic calibration and focus throughout scanning processes, making certain that data is obtained at the perfect focus for every measurement.
SmartPSI can provide a series of surface measurements in quick succession, yielding optimum results on super smooth surfaces in a matter of seconds. The surface topography repeatability (noise floor) is on the order of 0.06 nm with 0.005 nm rms repeatability. Successful measurement of even smoother surfaces and improved repeatability can also be achieved via increased averaging.
Smart Setup
Smart Setup eliminates high-level training requirements and guesswork when preparing a part for measurement. The system can automatically optimize set up parameters with a single button press, resulting in the provision of reliable surface data.
This feature can also measure to sub-nanometer levels, ideal when working with super smooth surfaces that commonly lack discernible features and details.
Non-Directional PSD
While every 3D optical metrology tool must be capable of simplified data acquisition, the notion of simplifying intelligent data analysis must also be considered.
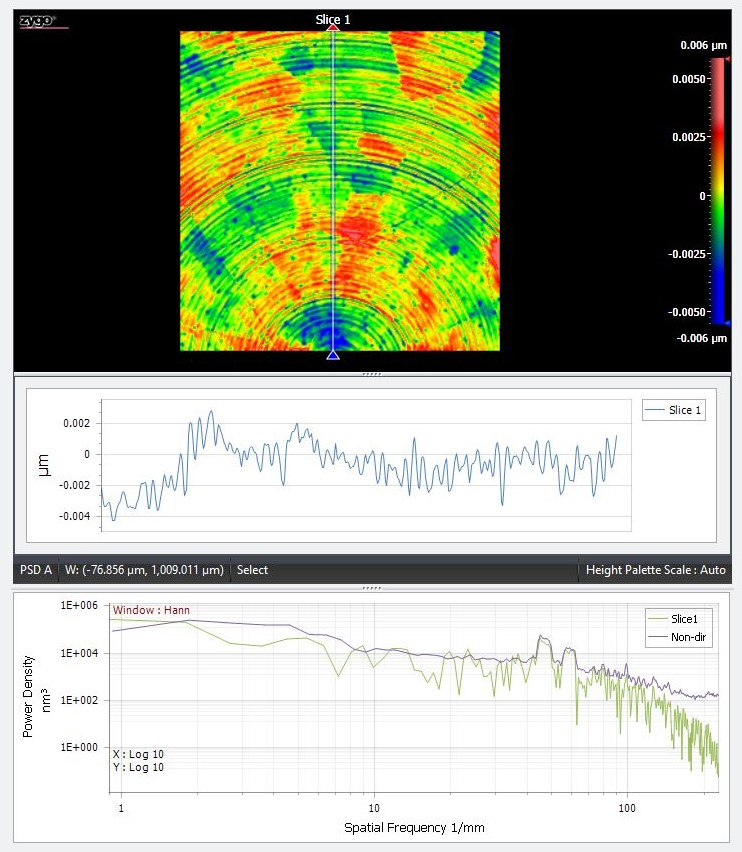
The Power Spectral Density (PSD) plot is one such tool that can help achieve this. PSDs show frequency content in topography maps of surfaces, and these are usually created from line profiles, which can be extracted from a surface map with ease via Mx™, ZYGO's built-in control and data analysis software.
It should be noted, however, that line profiles are highly sensitive to positioning and alignment, and if done incorrectly, PSD information may even be misleading. To address this, ZYGO's non-directional PSD analysis can generate a position insensitive PSD for the whole map, enabling fast, straightforward identification of interesting features in the surface structure.
Summary
CSI is generally characterized by its high resolution, speed, wide measuring range, large measurement area, and its sheer versatility in measuring a wide range of materials.
CSI can extend standard interferometric techniques, allowing them to accommodate surfaces with complex steps, roughness, discontinuities, and structure (such as transparent films). The method's additional benefits include the equivalent of an autofocus at each point in the field of view, effectively mitigating the impact of interference from scattered light.
ZYGO Corporation has centralized the CSI technique in its work, optimizing it as part of a new range of advanced, fully programmable and automated tools.
These tools allow sequences to be developed to measure multiple part segments, wide-area part stitching of larger surfaces into a single measurement, or recipe-based in-tray part measurements. Recipe configurations and user-level logins ensure that established metrology routines cannot be accidentally altered.

This information has been sourced, reviewed and adapted from materials provided by Zygo Corporation.
For more information on this source, please visit Zygo Corporation.