Within the refining industry, sulfidic corrosion of equipment and piping is a significant cause of issues and leaks that can lead to incidents potentially resulting in loss of property and injury to workers, unplanned outages and early replacements.
When exposed to hydrogen-free sulfidation corrosion conditions, carbon steels with low-silicon (<0.10%) content can corrode at an accelerated rate.
One-third of high-temperature sulfidic corrosion failures are caused by low silicon content, according to the American Petroleum Institute (API) Recommended Practice 939-C (Guidelines for Avoiding Sulfidation Corrosion Failures in Oil Refineries).
The API RP 578 PMI program is the verification of correct alloy installation in all sulfidation surfaces, both proactive and reactive, and API RP 939-C is a subcomponent of the larger program.
Visbreaker units, coker, fluid catalytic cracker and crude/vacuum are all examples of equipment where hydrogen-free sulfidation. There can be hydrogen-free sulfidation corrosion in the distillation and feed sections of hydrocracking and hydroprocessing units.
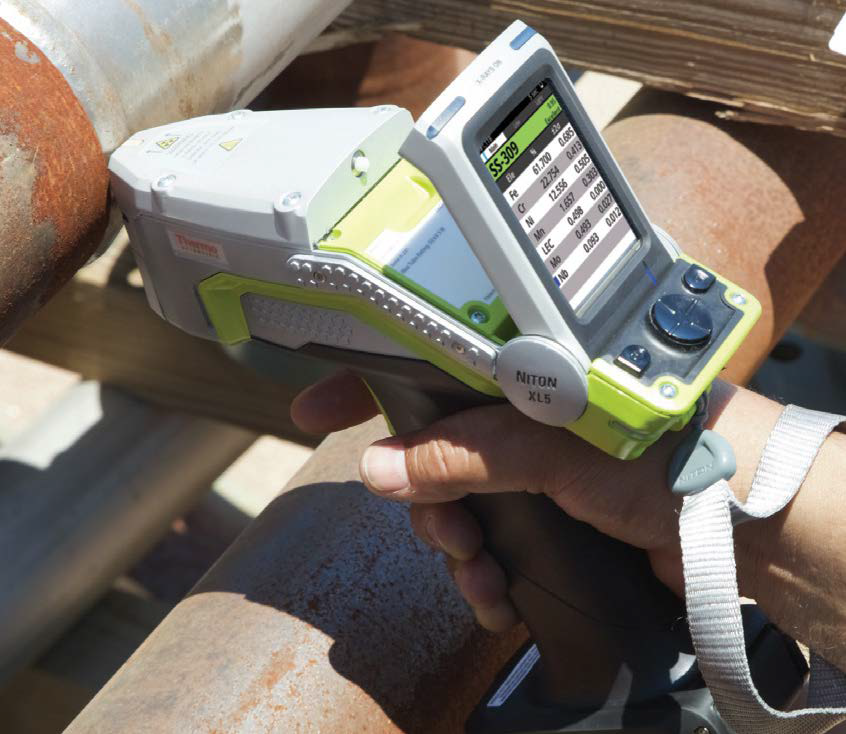
Silicon analysis of this kind of equipment and piping using portable X-ray fluorescence (XRF) is an ideal choice to assist in the prevention of these incidents from occurring. Precise, accurate and fast analysis of silicon and other elements in the field is enabled by the new Thermo ScientificTM NitonTM XL5 Plus.

The Niton XL5 Plus in use, analyzing steel piping. Image Credit: Thermo Fisher Scientific – Handheld Elemental & Radiation Detection
Niton XL5 Plus XRF Analyzer
The lightest and smallest high-performance XRF metal analyzer currently on the market is the new Niton XL5 Plus. Operator fatigue is reduced, and a greater number of test points can be accessed because of the Niton XL5 Plus’s lightweight and small size.
The best light element sensitivity and highest performance for the most demanding applications, such as low silicon measurement, are enabled by the latest silicon drift detector technology with graphene windows.
Accurate and fast elemental analysis in demanding refinery environments is delivered by the Niton XL5 Plus. This analyzer provides the refining industry many benefits, including:
- Rugged, housing, dustproof and splashproof to handle rough environments
- Accurate image capture and sample positioning enabled by small spot analysis and integrated camera
- Easy optimization for specific applications (like low silicon measurement) and custom workflow solutions enabled by a flexible user interface
- Reliable and outstanding sensitivity for light elements, including S, P, Si, Al and Mg
- Testing and productivity in tight spots without operator fatigue improved by the lightweight and small size
- Confident results every time thanks to unparalleled grade identification and chemistry accuracy
Method
After ensuring the surface was clear of any contaminants that could introduce silicon or other elements to the analysis, certified samples and reference standards were analyzed. The minimum analysis time and sample preparation requirements used were dictated by data quality objectives.
Carbon and low alloy steels are the typical metal alloys that are at risk of sulfidation corrosion. These alloys will oxidize when exposed to atmospheric conditions. When performing an XRF analysis, this oxide coating can affect the accuracy of the reading.
The oxidation will get worse as the chromium concentration in the metal gets lower. This means that in order to ensure an accurate reading, it is of extreme importance to remove any corrosion.
The surface can also often have grease, oil, or paint on it, in addition to oxidation. The results of the analysis can be impacted by calcium or metals such as zinc, calcium, or titanium, which are typically found in paint. Molybdenum and other additives can be found in grease.
All surface contamination must be removed in the area to be analyzed in order to get accurate silicon readings. Using a right-angle die grinder equipped with the proper abrasive media, such as a zirconia/alumina grinding disc, is the fastest way to prepare an oxidized surface.
Because this work was being done for low silicon analysis, the samples were analyzed for 9, 13 and 33 seconds using both the main filter (3 seconds) and light filter (6, 10, or 30 seconds) after thorough surface preparation.

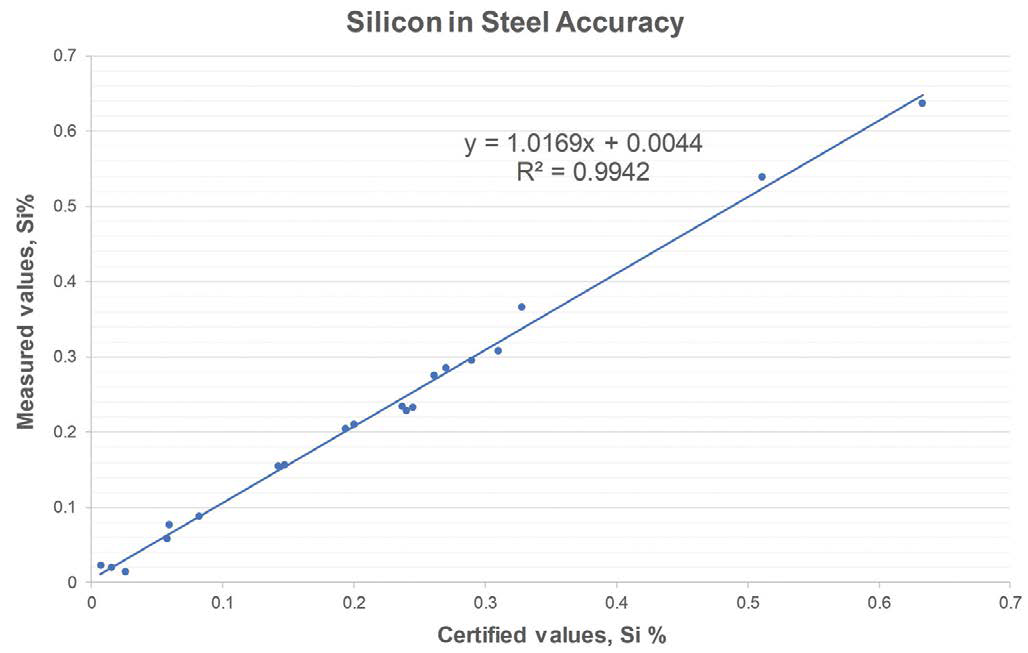
Figure 1. Silicon in steel accuracy using the Niton XL5 Plus analyzer. Image Credit: Thermo Fisher Scientific – Handheld Elemental & Radiation Detection

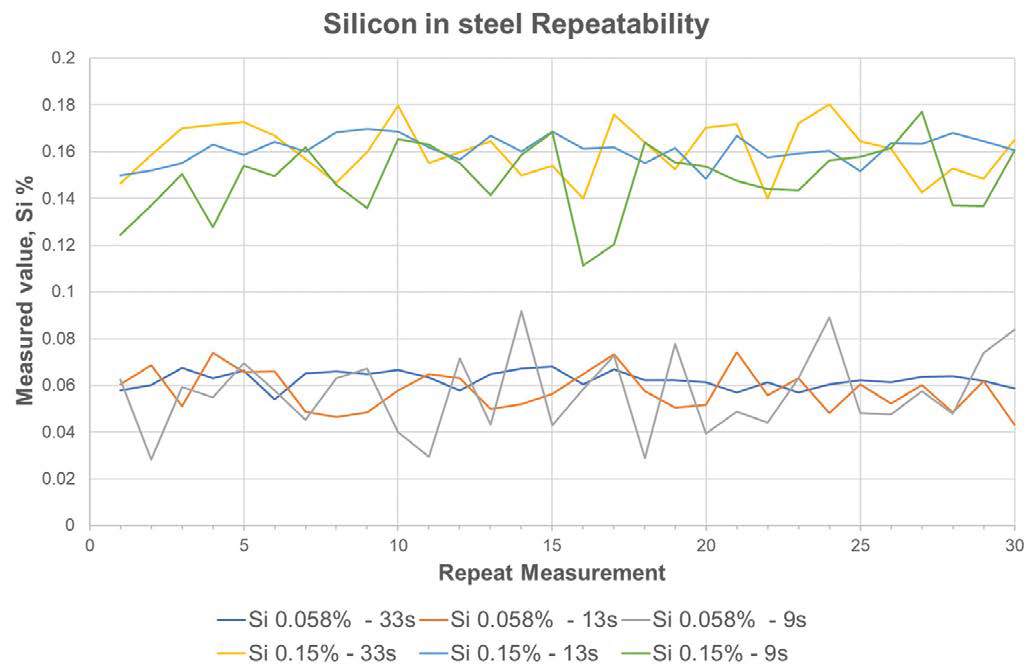
Figure 2. Silicon in steel measurement repeatability using the Niton XL5 Plus analyzer using 9, 13 and 33 seconds measurement time. Image Credit: Thermo Fisher Scientific – Handheld Elemental & Radiation Detection
The measurement repeatability data for a higher Silicon standard (0.147% Si) and a low Silicon standard (0.058% Si) using 9, 13 and 33 seconds measurement time is shown in Figure 2. The improvement in precision based on used measurement time is demonstrated in the data in Table 1.
Table 1. Effect of measurement time on silicon in steel measurement repeatability using the Niton XL5 Plus. All values in wt. %. Source: Thermo Fisher Scientific – Handheld Elemental & Radiation Detection
| Run Number |
9 Seconds |
13 Seconds |
33 Seconds |
| 1 |
0.037 |
0.057 |
0.056 |
| 2 |
0.054 |
0.044 |
0.061 |
| 3 |
0.069 |
0.060 |
0.057 |
| 4 |
0.064 |
0.070 |
0.064 |
| 5 |
0.089 |
0.062 |
0.060 |
| 6 |
0.055 |
0.064 |
0.064 |
| 7 |
0.046 |
0.072 |
0.056 |
| 8 |
0.054 |
0.061 |
0.059 |
| 9 |
0.053 |
0.049 |
0.067 |
| 10 |
0.079 |
0.067 |
0.066 |
| Average |
0.060 |
0.061 |
0.061 |
| Standard Deviation |
0.016 |
0.009 |
0.004 |
| Reference Value |
0.058 |
0.058 |
0.058 |
Conclusion
Excellent agreement with the laboratory results is demonstrated by the results achieved using the Niton XL5 Plus analyzer. The new analyzer enables more reliable and faster low silicon measurement even using short measurement time and provides the best light element precision and sensitivity.

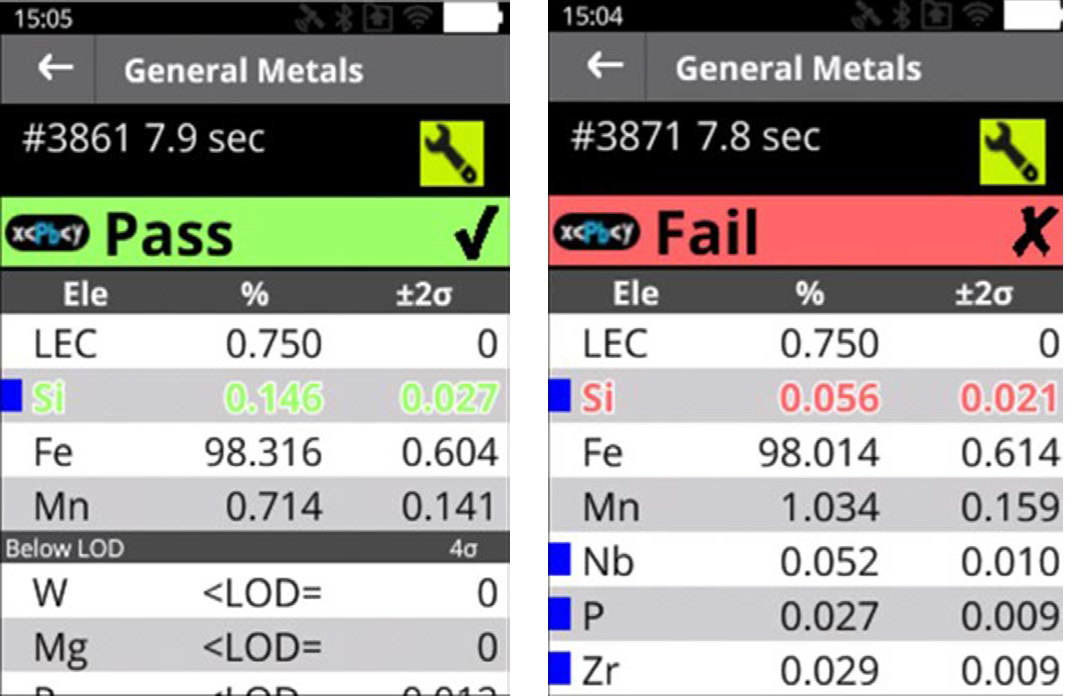
Figure 3. Capture of analytical results above (Pass: pipe not susceptible to sulfidic corrosion) and below (Fail: pipe susceptible to sulfidic corrosion) recommended threshold of 0.1% Si in carbon steel. Image Credit: Thermo Fisher Scientific – Handheld Elemental & Radiation Detection
The machine is able to reliably detect Si levels in steel at levels above and below the threshold of 0.1%, within less than 9 seconds, as shown in Figure 3, when given appropriate sample preparation.
Even more accurate results can be achieved by using an extended measurement time. Niton XL5 Plus has very good silicon measurement repeatability, as shown in Figure 2, and is able to reliably and quickly identify low Si steel with an elevated risk of sulfidation corrosion from higher silicon steel.

This information has been sourced, reviewed and adapted from materials provided by Thermo Fisher Scientific – Handheld Elemental & Radiation Detection.
For more information on this source, please visit Thermo Fisher Scientific – Handheld Elemental & Radiation Detection.