Additive manufacturing - commonly referred to as 3D printing - is arguably the most disruptive manufacturing technique of the 21st century. This fascinating and increasingly popular technique combines portability and speed with the ability to generate complex parts with a range of intricate features.

Register to the webinar HERE
The most prominent challenge in 3D printed versus more conventional casting and machining methods is that there is a lack of understanding surrounding the impact of a material’s microstructure on potential defects in manufactured parts. This lack of understanding means that these issues are difficult to control.
High-speed nanoindentation mapping represents one of the most promising means of characterizing the links between microstructure, elasticity and strength in 3D printed materials. Analysis data acquired via nanoindentation can lead to improved printing and processing methods, enhanced reliability and greater product safety.
This versatile and accessible method is able to measure material properties such as modulus, hardness, fracture toughness and resistance to deformation. Nanoindentation techniques are routinely used in research, manufacturing and materials development, and can be used to map and characterize the surfaces of a number of organic or inorganic materials, from electronics and semiconductors to packaging products, polymers, thin films and even biological materials such as cells and tissue.
This article explores the use of high-speed nanoindentation in mapping the hardness of a 3D-printed sample of Scalmalloy. Scalmalloy is a widely used commercial aluminum alloy explicitly designed for use in laser-powder-bed additive manufacturing.
Experimental Method
The Scalmalloy was printed before being mounted via metallography. This involved the part being set in epoxy and polished to expose a flat surface suitable for nanoindentation.
A KLA Instruments iNano® equipped with a Berkovich indenter was employed with the proprietary NanoBlitz 3D option. This allowed the rapid generation of an array of indentations on a 200 µm x 200 µm test area of the surface. This area contained an array of 60 x 60 indentations, for a total of 3,600 indentations.
Spacing between indents was around 3.3 µm, and the peak load for each individual indentation was 4 mN, resulting in an approximately 325 nm indentation depth. NanoBlitz 3D is able to complete one indent per second, meaning that the complete set of 3,600 indents was achieved in around 1 hour.
Results and Discussion
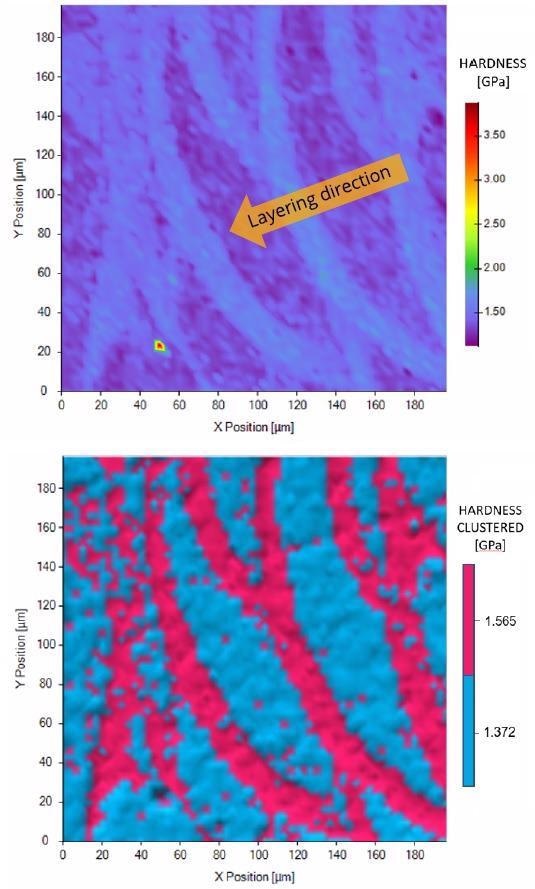
Figure 1 shows the NanoBlitz 3D hardness maps for the Scalmalloy. The upper image features the initial hardness map, while the lower image displays the same information after further processing with the iNano InView software. Note the material layering direction in the first hardness map.

Figure 1. Standard (top) and clustered (bottom) hardness maps of 3D printed Scalmalloy cross section generated from an array of 3600 nanoindentations; each indentation represents one pixel in the image. The 3D printing process deposited droplets onto the surface, creating rounded hillocks which cooled at different rates for the top of the hillock (higher hardness) and the softer core (lower hardness). As each layer of hillocks hardened, more were deposited with each successive layer. Image Credit: KLA Instruments™
This additional processing sorted the data into two groups using the K-means clustering method. K-means clustering minimizes the within-cluster variance by assigning individual hardness measurements to the cluster with the nearest mean value.
The resulting maps of a cross-section of 3D printed material revealed a distinct microstructure of interlocking ‘hillocks,’ exhibiting a higher surface hardness and a softer core. The clustered map provides further details, confirming that the higher-hardness surfaces exhibit a consistent thickness of approximately 15 µm.
It was determined that this variation in hardness stemmed from the laser-rastering process used to fuse the powder bed of each layer. The precise mechanism for this variation is not fully understood, however.
It was hypothesized that the formed hillocks’ upper surface could be harder due to their more rapid cooling, resulting in a quenched microstructure. It is also possible that the materials segregate within the melt pool according to their cooling rates.
It will be necessary to conduct additional investigations of material composition and crystallinity to explain the underlying cause of this hardness distribution. It was noted, however, that the observed hardness variation had minimal impact on the distribution of Young’s modulus.
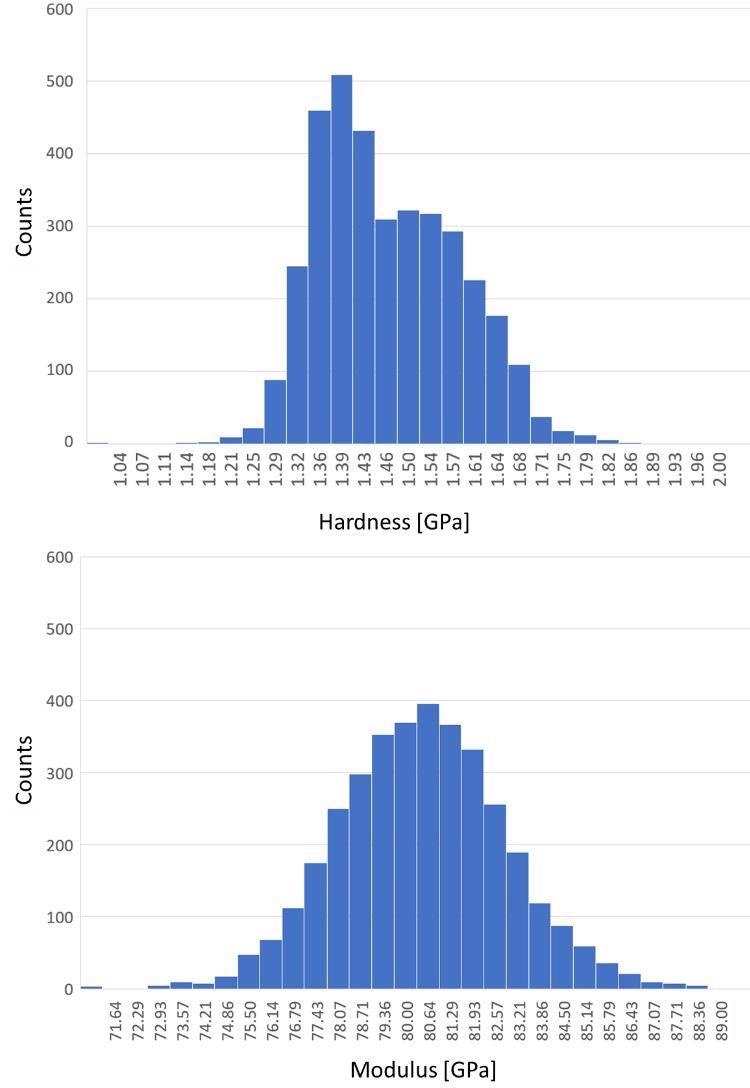
Figure 2 displays histograms for all 3,600 measurements of hardness and Young’s modulus. It was noted that the hardness histogram (top image) was broad and featured a binomial distribution, while the Young’s modulus (bottom image) was Gaussian.

Figure 2. Histograms of hardness (top) and modulus (bottom) from 3600 nanoindentations on 3D printed Scalmalloy. The hardness histogram shows two peaks for the surface and internal hardness of each hillock, while the modulus distribution is Gaussian. Image Credit: KLA Instruments™
Conclusions
The 3D metal printing process generates a unique microstructure with mechanical properties that should not be assumed to be identical to the microstructure of parts manufactured from the same metal using traditional methods.
For 3D printed Scalmalloy, for example, high-speed nanoindentation highlighted an unexpected distribution in hardness alongside a uniform modulus.
These findings highlight the usefulness of material property maps achieved by high-speed nanoindentation in uncovering and quantifying the distinct microstructural properties of 3D printed metals.
It is anticipated that this detailed nanomechanical information will prove to be a driving force in the improved design and control required to optimize the performance of 3D printed metal parts.

This information has been sourced, reviewed and adapted from materials provided by KLA Instruments™.
For more information on this source, please visit KLA Instruments™.