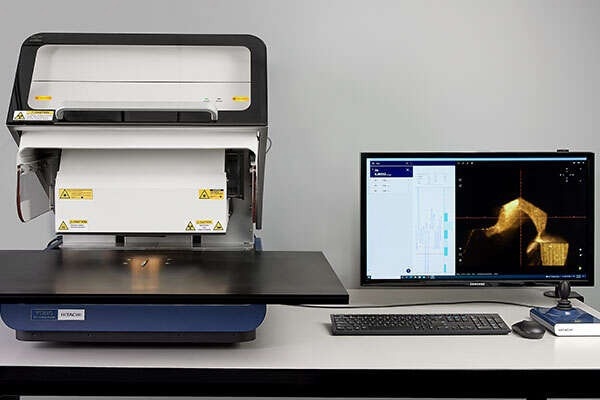
The FT230 XRF coatings analyzer is built specifically to meet the demands of the coatings industry. Incorporating the combination of user experience features with high-end analytical components and a new software interface, the FT230 makes testing higher volumes easier while freeing up operators to perform other tasks while the XRF is measuring.

Image Credit: Hitachi High-Tech Analytical Science
This article will outline four novel features that are designed to accelerate coatings analysis.
1. Find My PartTM – Straightforward Automated Routine
This XRF’s machine vision feature brings together all the necessary steps an operator must perform to set up an XRF measurement – choosing calibrations, finding measurement locations, selecting collimators and reporting the results – into one streamlined, automated routine.
The operator inserts a part into the instrument, selects the Find My PartTM operation, and the instrument loads the entire, prescribed analytical routine.
The only task required of the operator is confirming the identified part, and the FT230 takes care of the rest, including transmitting the results to the right place or generating a complete report for customers. This frees the operator allowing them to return to the production floor or work on another instrument in the lab.
Find My PartTM can create up to 72% time savings (and sometimes more) when it comes to setting up a complex measurement and betters the chance of it being right the first time.
As well as the machine vision capabilities, Find My PartTM also makes loading a measurement easy by scanning the QR or barcode from a traveler or using text search. For a basic setup, where Find My PartTM isn’t required, the FT230 has additional features that will boost operations by enhancing testing capacity and operator utilization.
2. Simplify Part Set-Up with a Wide-View Camera
When measuring various locations on a large sample, the operator generally needs to search for each location using only the standard, narrow-field camera image. However, this view is only intended for making minor adjustments in final sample positioning; bearing in mind the small beam sizes of an XRF coatings analyzer, the view only shows the operator a restricted view of the part.
The XRF coatings analyzer makes it easier to find the first measurement location when the sample is directly placed into the instrument (e.g., a laser showing where the X-Ray beam will be, or a pre-positioning laser when the stage is ejected), but after the first location, the operator is on their own.
This can waste time, leading to frustration as the operator searches for the points that remain.
Hitachi’s FT230 can be equipped with a second camera to get a better view of the sample chamber to streamline part set-up. To make use of the wide-view camera, the operator inserts the sample into the chamber and clicks a button in the software. In just a few seconds, the XRF generates a view of the stage area that can be analyzed and displays that image next to the narrow-field image.
The operator can then ensure they select the right area as they are able to zoom in on features in the wide-view image to read component labels and see finer details. The operator selects the desired feature as displayed in the wide-view image, and that point is moved into position for analysis. The operator is then able to utilize the narrow-field image to carry out any final adjustments that are needed.
Benefits of Using a Wide-View Camera
A relatively straightforward experiment demonstrates the advantages of using the wide-view camera. An automated, multipoint measurement program was produced to measure a circuit board that measures 5.75” x 9.5”. The program was calibrated to measure 5 points – one in the middle of the board and one in each corner.
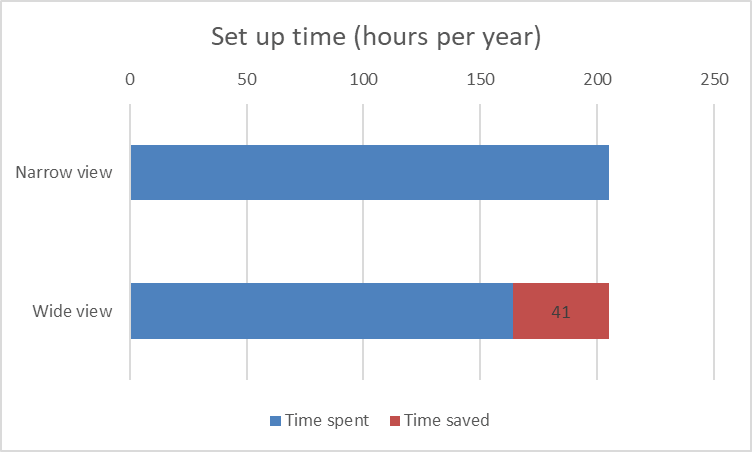
The same trained operator then performed this in two different ways: once by only using the narrow-field camera and once by incorporating the use of the wide-view camera. Since the measurement time is equal in both scenarios, only the time to set up the program will be taken into consideration. The results are displayed below.
Time to generate a 5-point program using only the narrow-field camera: 73 seconds
Time to generate a 5-point program using the wide-view camera: 59 seconds
Overall time savings: 14 seconds (20% savings)

Image Credit: Hitachi High-Tech Analytical Science
Initially, 14 seconds may not seem like a significant chunk of time, but in high-volume manufacturing facilities, testing at least 50 boards a day is not uncommon. In one day, that 14 seconds can add up o more than 12 minutes, where an operator could be free to carry out other tasks.
For 200 days, utilizing the wide-view camera would enable the user to generate over 40 hours, or the equivalent of a full working week, of extra productivity for XRF operators.
The wide-view camera can also be used in combination with other features such as auto focus or auto approach to save even more time when getting samples ready for measurements.
3. The Auto Approach Gives Users Confidence in Their Results
It is best to make sure the distance between the X-Ray tube, part and detector remain the same for each measurement to ensure that results from an XRF coatings analyzer are consistent. This is because X-Ray intensity is a function of distance and any variations that occur in the tube-part-detector geometry influence thickness measurements.
XRF coatings analyzers usually use one of two ways to preserve this important geometry – a focus laser or video focusing that assesses image contrast.
The analyzer’s head (which contains the X-Ray tube and detector) moves up or down until the instrument’s focusing routine is finished; in some cases, this means the operator must make final minor adjustments. These routines take extra time to initialize, move, and finalize. This can also lead to human errors if operators are required to make key decisions.
The FT230 can be equipped with a feature called auto approach that only requires one click to ensure the head is in the right position.
Sensors within the instrument measure the distance to the sample. When activating auto approach, the instrument is able to compare that distance to the working distance (also referred to as focal distance) selected in the calibration and places the head in that position.
This allows the operator to rest assured that the results will be accurate without spending time and potentially making a mistake when it comes to focusing the part.
The Advantages of the Auto Approach
A relatively simple experiment demonstrates the benefits of the auto approach. Six parts of heights ranging from 4.8 – 6.6” (1.9 – 2.6 cm) are placed into the chamber. The operator generates a multipoint program to measure one location on each part.
The same trained operator performed this in two different ways: once utilizing the focus laser (the head moves and the operator establishes when the part is in focus) and once with the application of the auto approach (the head moves to the correct focal distance automatically without operator intervention).
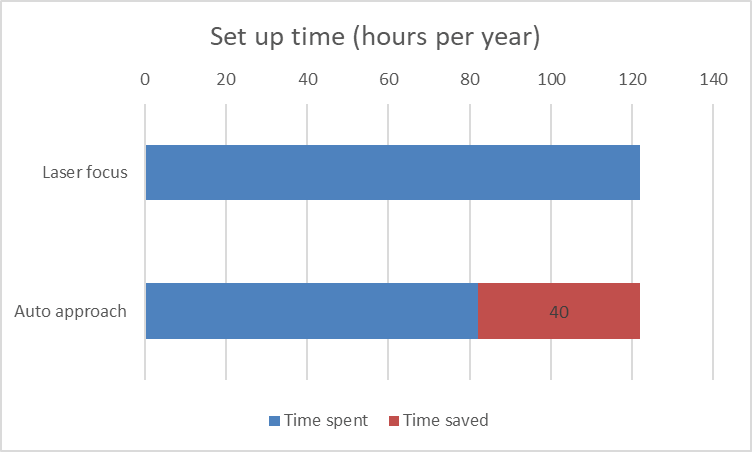
As the measurement time is the same in both instances, only the time needed to set up the program will be taken into consideration. The results are displayed below.
Time to generate a 6-point program using only the laser focus: 44 seconds
Time to generate a 6-point program using the auto approach: 29 seconds
Overall time savings: 15 seconds (33% savings)

Image Credit: Hitachi High-Tech Analytical Science
This might not seem like a lot of time, but in everyday practices where this exercise would be performed 50 times daily, the operator can save 12 minutes and use that time to carry out other key tasks.
Over the course of 200 days, using the auto approach can generate over 40 hours, or the equivalent of a full working week, of extra productivity for your XRF operator.
The auto approach can be used in combination with other key features such as a wide-view camera to save additional time in ensuring samples are ready for measurements.
4. Auto Focus - Higher Testing Volumes
After the part has been positioned for measurement, the final step before pushing the start button is to bring the part into focus. This is typically achieved either with a focus laser or by using a routine that assesses image contrast.
Throughout each method, the analyzer’s head containing the X-Ray tube and detector moves up or down until the completion of the instrument’s focusing routine is achieved; in some circumstances, the operator must make final minor adjustments.
These routines consume valuable time to initialize, move, and finalize and may lead to potential errors if operators need to make decisions.
Hitachi’s FT230 can be equipped with an auto focus feature that does not require operator intervention and does not move the analyzer’s head. When active, the camera focuses on the part in the measurement crosshairs automatically.
The routine also measures the distance to the part, which means the operator is free to measure parts that have varying heights or have stepped geometry. This is extremely fast and allows for greater testing volumes while the operator spends less time assembling each of the parts.
Benefits of Using Auto Focus
A relatively simple experiment demonstrates the benefits of using auto focus. Six parts of heights ranging from 4.8 – 6.6” (1.9 – 2.6 cm) are placed into the chamber. The operator generates a multipoint program to measure one location on each part.
The same trained operator performed this in two different ways: once with the application of a focus laser (the head moves and the operator establishes when the part is in focus) and once utilizing the auto focus feature (the head does not move and the operator has no input on the focusing).
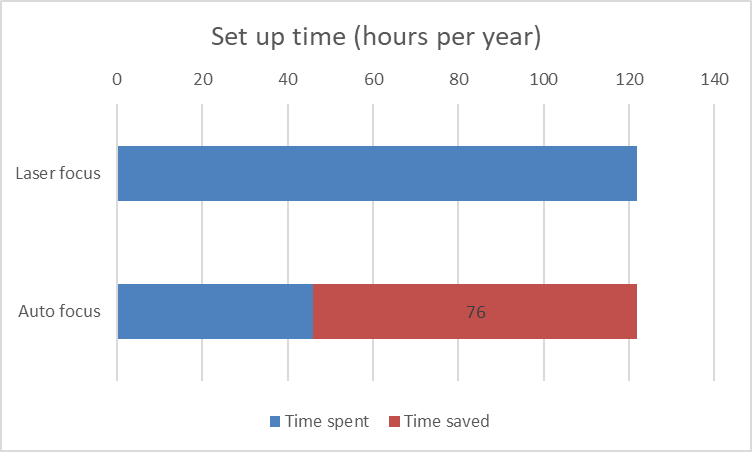
Since the measurement time is equal in both scenarios, only the time to set up the program will be taken into consideration. The results are displayed below.
Time to generate a 6-point program using only the laser focus: 44 seconds
Time to generate a 6-point program using auto focus: 17 seconds
Overall time savings: 27 seconds (62% savings)

Image Credit: Hitachi High-Tech Analytical Science
This is good savings for a single run, but consider that typically at least 50 runs like this are performed each day, which adds up to more than 22 minutes a day where an operator is free to perform other key tasks.
Over the course of 200 days, using the auto focus can generate over 76 hours or close to 2 weeks of extra productivity for an XRF operator.
Auto focus can be used in combination with other key features such as a wide-view camera to save extra time when readying samples for measurements.
The greater the range of part heights, the more advantageous auto focus becomes due to the fact the operator spends less time having to make head position adjustments. Also, when the focus laser is being used, the range of part heights is restricted by the working range, also known as focal distance.
Using auto focus, the FT230 is not restricted as it can measure parts that vary in height by up to 2.6” (67 mm).
Contact Hitachi today to discover more about the FT230 XRF coatings analyzer.

This information has been sourced, reviewed and adapted from materials provided by Hitachi High-Tech Analytical Science.
For more information on this source, please visit Hitachi High-Tech Analytical Science.