Nowadays, most studies utilizing diffraction contrast tomography, either in the lab or at the synchrotron, have concentrated on relatively low-aspect-ratio samples, usually rectangular or cylindrical pillars. In the current study, the feasibility of performing lab-based nondestructive 3D grain mapping was tested on a high-aspect-ratio structure: aluminum foil. Similar to other metals, the aluminum foil has a crystalline microstructure, which in this case will also be constrained by the thin, nearly 2D geometry of the object itself.
Aluminum, as a representative of thin metal foils in general, extends its applications from insulation materials to electronic mobile devices. The foil’s discrete crystalline structure, texture, and orientation govern the mechanical and electrical properties and performance of these materials and devices.
The experiment was performed using LabDCT (laboratory diffraction contrast tomography), which is an optional module for the ZEISS Xradia 520 Versa X-ray microscope allowing the user to nondestructively investigate and map the grain structure of crystalline materials in 3D. The method is based on latest developments at synchrotron facilities now being integrated by ZEISS into a laboratory instrument. The laboratory integration is especially unique, making the characterization methodology widely usable and accessible. Figure 1 illustrates this method in which a sample is illuminated with polychromatic X-rays in cone-beam geometry and a series of diffraction patterns is collected in a Laue focusing condition over a range of projection angles of the sample.
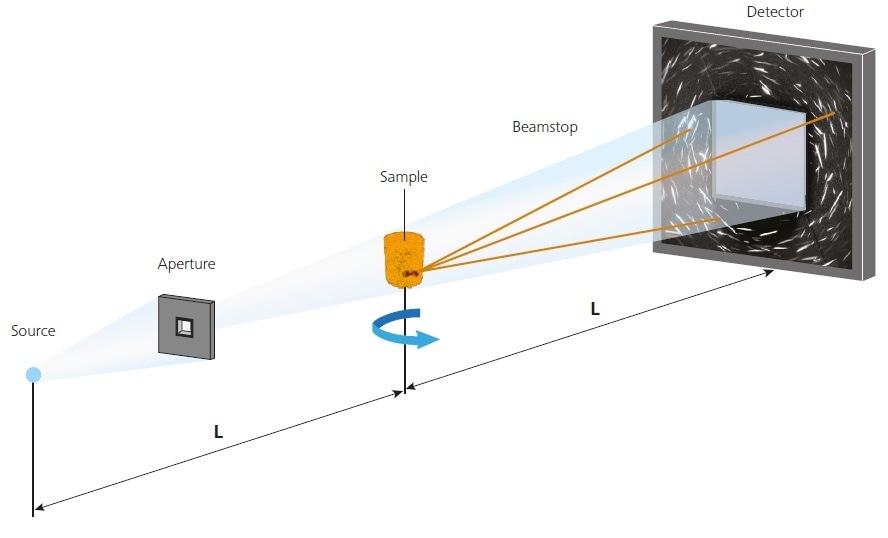
Figure 1. Schematic of the X-ray tomography setup in LabDCT mode. Notice the two additional components, aperture and beamstop, added to the setup to enable acquisition of the diffraction patterns. LabDCT data is collected on the same detector as the absorption data
Such diffraction patterns contain information about the size, location, and crystallographic orientation of grains within the sample which can then be computationally reconstructed to recover the 3D crystalline information. This data can subsequently be correlated to the results of standard absorption-contrast tomography, or even other imaging modalities like electron or light microscopy, enabling crystallographic information to be coupled to features of interest located by the X-ray microscope such as flaws, cracks, pores, welds, etc. [1,2]
Experimental Procedure
A razor blade was used to cut a small section (1 mm x 2 mm) of 17 μm-thick aluminum foil and this was glued to the tip of a pin. Additional surface treatments or sample preparation were not required.
The sample was then mounted in a ZEISS Xradia 520 Versa X-ray microscope equipped with the LabDCT module. In order to limit the illumination to the sample, an aperture was inserted between the source and sample. A rapid absorption contrast tomograph was initially collected (1s exposure, 720 projections), to capture the 3D geometric structure using conventional X-ray imaging techniques. A beamstop was then inserted between the detector and sample to block the primary transmitted beam’s illumination of the detector, isolating the X-ray diffraction pattern.
Diffraction contrast tomography was then carried out at 50 kV, collecting 181 patterns over the full 360 degree sample rotation range. Figure 2 shows an example of one such diffraction pattern.
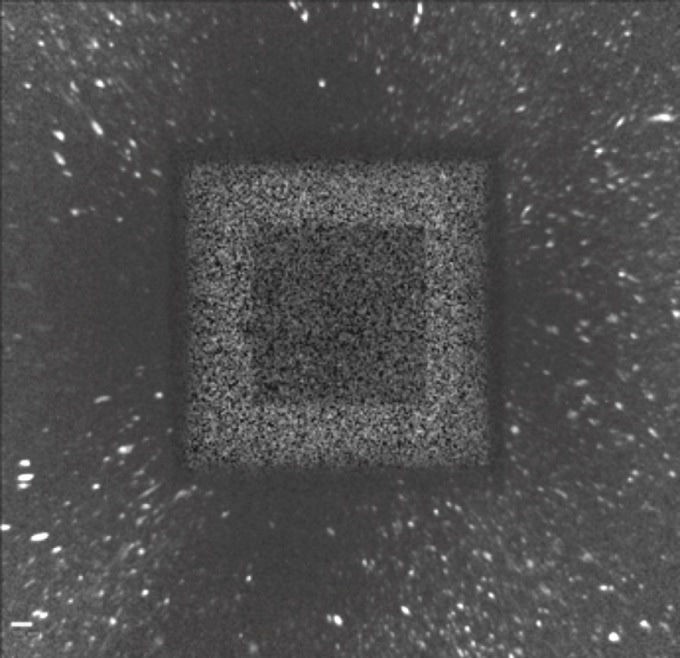
Figure 2. Diffraction patterns seen in an image frame collected as part of the LabDCT scan. The spots on the detector are reflections from several grains. The central square portion of the detector corresponds to the detector area behind the beam stop.
Figure 3 shows the schematic representation of the LabDCT workflow which includes data acquisition and data processing steps. LabDCT data was reconstructed using the incorporated GrainMapper3D (Xnovo Technology ApS, Galoche, Koge, Denmark) software. The software has a workflow-based procedure and is designed with emphasis on the ease-of-use.
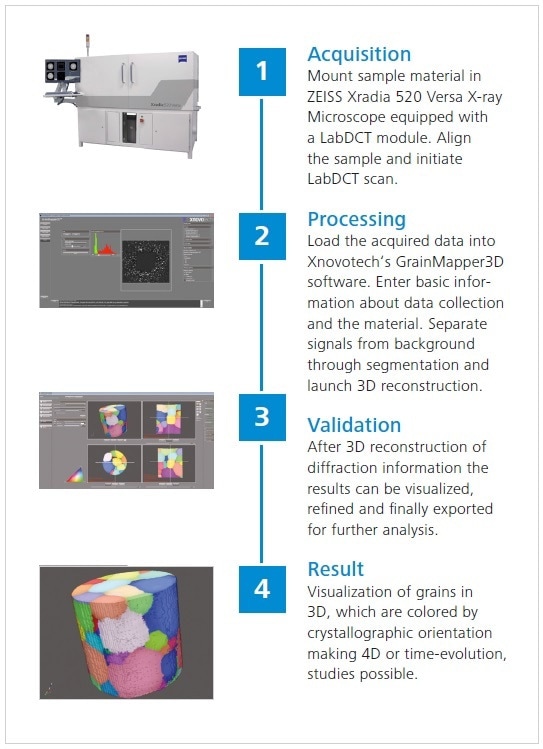
Figure 3. LabDCT acquisition and grain reconstruction workflow.
Figure 4 shows a screenshot of the user interface of GrainMapper3D. Data from both the absorption contrast tomography and diffraction contrast tomography, together with crystal space group and lattice parameters for aluminum, were input. The grain information contained in the diffraction patterns was reconstructed by the software to provide location, size, and orientation of the numerous grains. The built-in visualizer of GrainMapper3D immediately displayed the results.
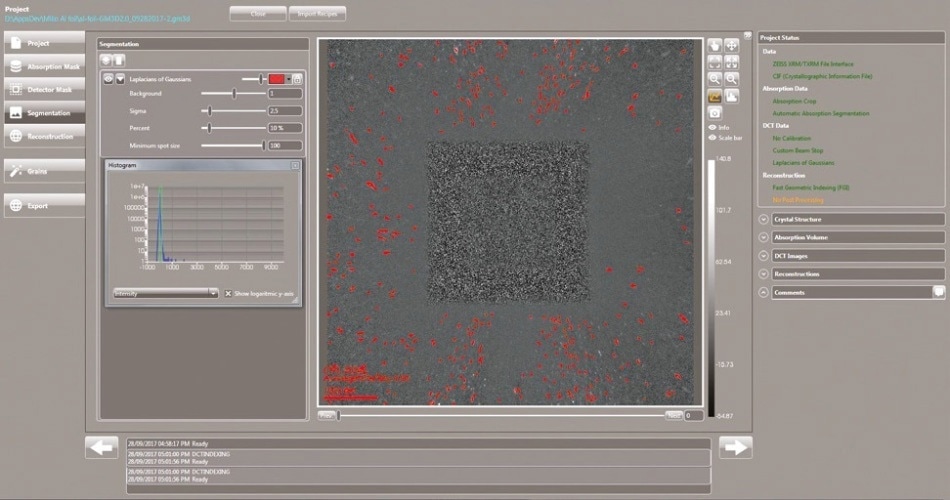
Figure 4. Screenshot of the guided user interface of the 3D grain reconstruction software – GrainMapper3D software.
Results
Reconstructed data was used to create 3D grain maps. In Figure 5, the grain map is by crystal orientation (right). The completeness map can be used to evaluate the Grain ID assignments. The completeness map is the difference between the expected reflections and the reflections measured on the detector. The sample is approximately 1x2 mm in size, providing statistics on larger volumes, at faster acquisition times, to supplement other analyzes like synchrotron or EBSD methods. It is clear from the plots that the grain distribution is relatively uniform and shows no strong texture or anisotropy in 2D which can sometimes be present in rolled metal sheets depending on the fabrication process. (The final steps of aluminum foil production usually consist of cold rolling followed by an annealing step that would result in a relatively homogenous microstructure.)
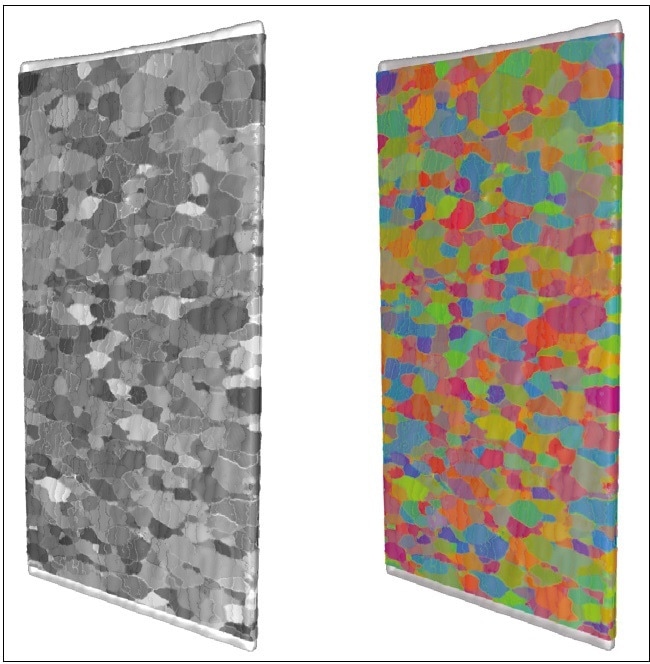
Figure 5. Reconstructed grains in the aluminum sample (left) completeness map and (right) 3D grain map. Sample size is 1x2 mm.
Using grain size results, a distribution of grain equivalent diameter was plotted as shown in Figure 6. Most grains were found to be in the 30-80 μm range, with a few grains which were larger in the range of 100-120 μm. Note: these values are larger than the thickness of the foil (17 μm) due to larger dimensions of the grains in the planar direction.
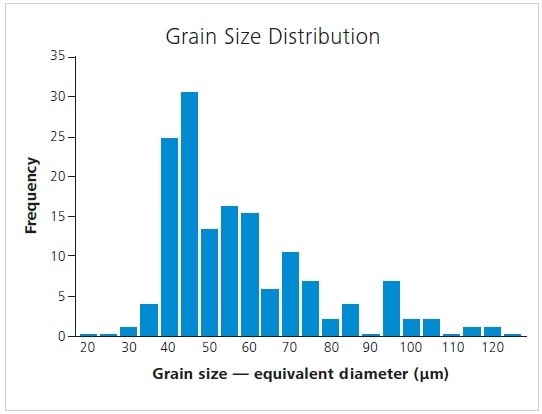
Figure 6. Histogram showing the grain size distribution in the aluminum foil sample calculated from the LabDCT data.
It is important to note that the grain structure of this sample was reconstructed with high fidelity, considering its small thickness. Using LabDCT data from “traditional” samples with pillar or cylindrical or pillar geometry, best detection limits concerning grain size have typically been demonstrated on the order of 30 or 40 μm diameter. Although grains’ dimension in one direction was restricted to less than 17 μm, many were analyzed in this sample. This is because the sampled volume is considerably smaller than most bulk volumes imaged using LabDCT, enabling even the weak diffracted signals from the small grains to emerge from the sample. Furthermore, significantly decreasing the sample volume decreases the number of overlapping diffraction spots on the detector. This allows analyzing and subsequently reconstructing smaller individual grains more easily.
Conclusions
In this work, LabDCT was used to nondestructively study the grain structure in a thin foil sample of aluminum with no significant sample preparation. This sample represents thin metal foils used in electronic devices or other lightweight metals applications. The grains were successfully reconstructed, proving that the foil has a uniform distribution of grain sizes, mostly with equivalent diameters of several tens of microns without any noticeable texture. The results confirm the feasibility for LabDCT analysis of small grains within thin, planar samples. Potential future extensions of this study could include the 4D evaluation of the grain structure under external load (cracking under tension) or extended treatment (such as heat).
References:
[1] S. A. McDonald, et al., Non-destructive mapping of grain orientations in 3D by laboratory X-ray microscopy, Scientific Reports, 5 (2015) 14665.
[2] C. Holzner, et al., Diffraction Contrast Tomography in the Laboratory – Applications and Future Directions, Microscopy Today, July 2016, p. 34-42.
[3] Carl Zeiss X-ray Microscopy, Unlocking Crystallographic Information from Laboratory X-ray Microscopy, Technical Note, (Pleasanton, CA), 2015.
[4] Carl Zeiss X-ray Microscopy, Non-destructive Characterization of 3D Grain Structure in a Titanium Alloy, Application Note, (Pleasanton, CA), 2016.
[5] S. A. McDonald, et al., Microstructural evolution during sintering of copper particles studied by laboratory diffraction contrast tomography (LabDCT), Scientific Reports, 7 (2017) 5251.

This information has been sourced, reviewed and adapted from materials provided by Carl Zeiss Microscopy GmbH.
For more information on this source, please visit Carl Zeiss Microscopy GmbH.