In component and materials testing, extensometers are used in many different applications. Consequently, the technical needs for these devices are many and diverse, meaning that there is no single device that meets all the requirements.
The properties of the material to be tested mainly determine the needs for an extensometer. This includes the material’s dimensions and shape, the formal standards that need to be fulfilled, and the test requirements. These define the test sequence, accuracy, gage length, and environmental conditions like test temperature.
Specimen-Related Criteria
However, the right choice of extensometer cannot be necessarily restricted to the basic material properties like specimen dimensions, plasticity, strength, and stiffness alone. It is equally important to decide whether an extensometer can be directly connected to the specimen without mechanically damaging the specimen itself or affecting the load measurement. Extremely thin specimens like foils can be vulnerable to clamping forces, while very small wire specimens do not offer sufficient visible area for consistent non-contact measurements.
Traditionally, a high stiffness in the initial extension range, followed by high plasticity needs more than a single extensometer. While the first property determines small strains (usually around 5 mm) very accurately in the elastic range, the second one determines very high values (usually 500 mm).
Specimens made of transparent materials or with extremely smooth, reflective surfaces are unsuitable for non-contact measurement without first fixing the measuring marks onto the specimen’s surface.
One important thing that needs to be considered is the behavior when the specimen fails. Hard plastics and metals are capable of slipping through the knife edges of a contact extensometer without causing any damage to them, while swiveling knife edges will further decrease the risk of damage, even if the specimen’s surface is specifically rough.
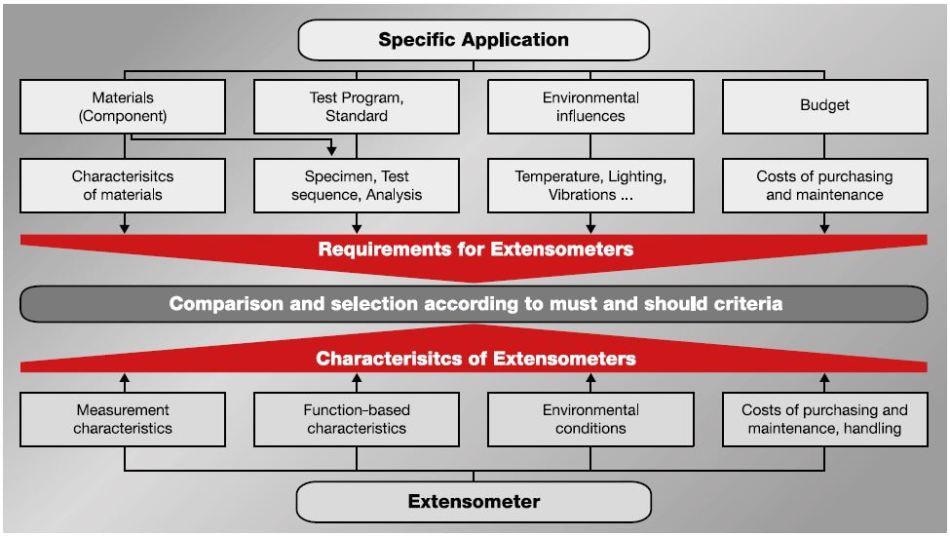
Extensometer selection chart
Flexible or high-extension specimens can destroy or damage the knife edges and even the extensometer itself because of splintering, whiplash, or de-lamination of specimens (for instance, steel rope). Non-contact measurement is required for such applications.
Criteria for Accurate Measurements
In the case of contact type measuring extensometers, the measurement travel is usually a fixed and engineered value that depends on the range of the measurement transducer, and with fulcrum hinged sensor arms, it is the leverage ratio. The initial gage length is either set manually through fixed steps or automatically over a specified range.
Non-contact extensometers using a video camera should have a larger field of view than the needed range plus the initial gage length. During the test, the position of the measuring marks on the specimen changes because the specimen parts lie beyond the gage length and the machine components themselves deform in the direction of loading.
For extension and/or gage lengths, which are anticipated to be beyond the field of view, the distance between the video camera and the specimen should be increased or the objective lens should be changed. All these actions reduce the measuring accuracy; moreover, every changed measurement configuration has to be modified and calibrated.
Measurement Accuracy
“Accuracy” is a commonly used, qualitative term. For qualifying the integrity of a measured signal, standards employ quantitative terms like “uncertainty,” “deviation,” or ‘‘resolution” and definitive values are given for these. Requirements for the precision of extension measurements accuracy are usually given in international standards and application-specific test requirements. The majority of test standards, like those for tensile tests on plastics and metals, refer to standards for calibration of extension measurement systems and their needed accuracy classes.
Precision Measurement for Very Small Strains
The graph illustrates stress-strain curves with measurement points for assessing tensile modulus or elasticity, with a strand of human hair in the background. This shows the high accuracy needed of an extensometer, for instance, to establish the plastics’ tensile modulus to ISO 527. The strain measurement system used should be able to measure to 1 μm accuracy ranging from 25 to 125 μm when initial gage length of 50 mm is used.
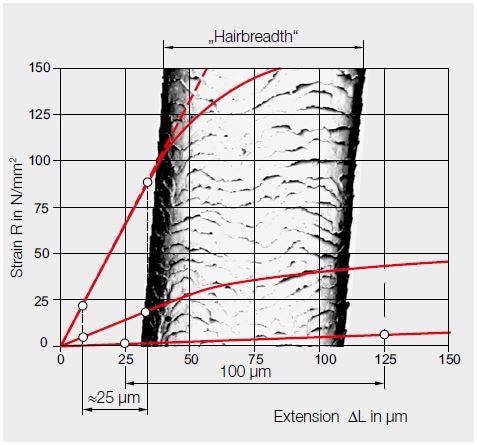
Precision measurement on the finest scale
Ergonomics
Devices that can be easily set up and sequences that can be automated reduce both effort and personnel time and simultaneously enhance the quality of the test results because subjective effects are reduced. This specifically applies to series testing.
Economics
Costs related to higher initial acquisition can be readily amortized, particularly when the extensometer can be employed for many different applications, rendering extra purchases superfluous. Also relevant are the system operating costs, such as time needed for configuration of manual systems for testing, maintenance due to wear, and cost and time of specimen preparation.
If a video extensometer is used, the costs and time needed to mark the specimen should be taken into consideration and also any possible human error that may be introduced in aligning or attaching the marks.
Contact-Type Measurement Extensometers
Sensor-arm extensometers and clip-on extensometers are in direct mechanical contact with the specimen through knife edges, which are perpendicular to the gage length. The very small contact force from the knife edges can impart a microscopic indentation into the surface of the specimen, giving a light form-fit and thus an accurately positioned contact point. This factor is significant for the huge measurement accuracy as well as small scatter bandwidth of the quantified values.
Due to the direct contact with the specimen, sensor-arm extensometers can either be damaged or destroyed by whiplash at the failure point of high-extension/high-elasticity specimens.
Clip-On Extensometers
As the name implies, clip-on extensometers are often mounted directly on the specimen. The mechanical parts, which convey extension, through knife edges, from the specimen to the internal transducer are stiff and short. There is almost no relative movement between the extensometer and the specimen, and due to this reason, the accuracy of the measurement is quite high. Furthermore, the range of a clip-on extensometer is restricted to a few millimeters and it directly applies a load to the specimen. The patented digital extensometers from Zwick offer a highly compact digital measurement system with a large measurement range of around 40 mm and a resolution of 0.1 μm.
Some extensometers come with counter-balance weight and double-sided measuring systems are applied to offset the superimposed bending strains. While the application and removal are usually manual, some products are fitted with motorized application and removal systems to minimize setting errors.
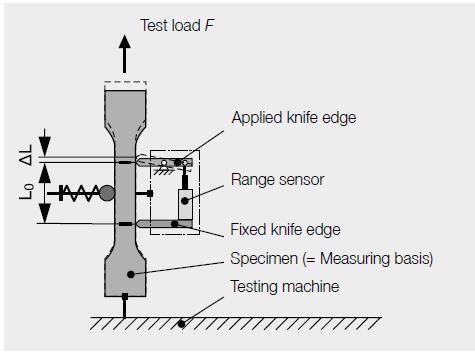
Figure 1. Measuring with clip-on extensometers
Extensometers with Sensor Arms
The main advantages of sensor-arm extensometers are automatic operation and a wide measurement range with high measurement precision. These extensometers are appropriate for a wide range of applications. Precision designs with a balanced and smooth mechanical operation apply only minimum loading to the specimen (as little as the measurement marks applied to non-contact extensometers). Superimposed bending strains are largely compensated because the sensor arms remain in contact with either side of the specimen.
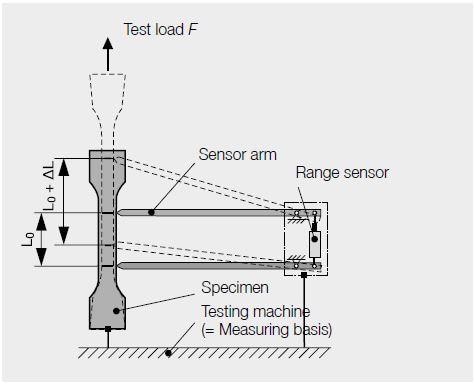
Figure 2. Measuring with sensor-arm extensometers
Non-Contact Extensometers
In laser and non-contact video extensometers, one major benefit is that they can be used up to break without any damage even when specimens exhibiting whiplash are being tested.
videoXtens — Measurement with Gage Marks
The videoXtens needs measurement marks to be linked to the specimen, which are optically distinct from the specimen’s surrounding area. If there are no visible marks on the surface of the specimen, gage marks are adhered or fixed to the specimen, or the specimen is directly marked using a sprayed-on color pattern, or paint and so on.
Software algorithms are used to evaluate the position of the measurement marks. These algorithms determine a specific area around an optical center point. This turns out to be the gage length and as the specimen is loaded, the marks’ movement is changed to extension values. Background illumination of the specimen or special lighting for surface improves the contrast to the measurement mark.
During specimen deformation, the lighting on both the measurement marks and the specimen changes, and the surrounding influences (reflections and so on) can affect the optical center point. This is usually the cause of scatter in the test results.
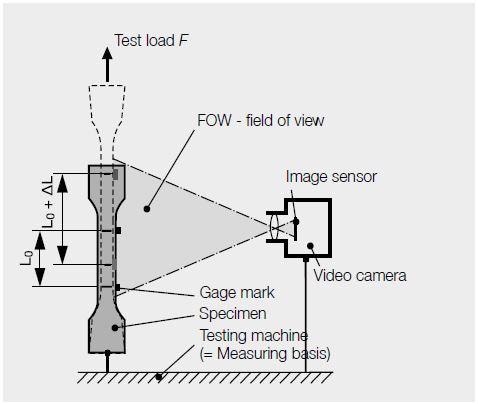
Figure 3. Measuring with extensometers with video camera
laserXtens — Measurement Without Gage Marks
laserXtens, the newest extensometer from Zwick, is a non-contact extensometer in which gage marks are not required. It employs the special structure of a specimen’s surface as a “fingerprint” to create a virtual gage mark. Laser light directed on these points is reflected in different directions corresponding to the structure of the surface and produces a particular pattern of speckles. The chosen gage marks are tracked and changed to direct extension values. During specimen deformation, the change in the surface structure is also continuously assessed.
laserXtens integrates a number of benefits in a single instrument: it delivers high accuracy and resolution; it is wear-free, its non-contact operation does not affect measurement, and it can be applied in extended and high temperature ranges.
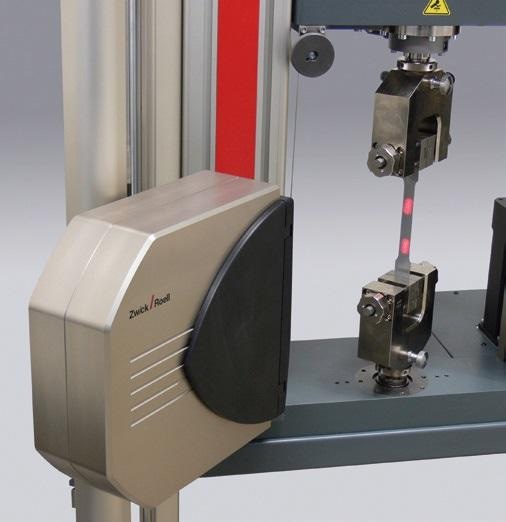
Figure 4. LaserXtens with typical speckle pattern
Zwick is Offering a Wide Range of Extensometers
Contact-type extensometers are highly cost-effective and can measure extension quite accurately. Yet, clip-on extensometers need more manual intervention and can carelessly introduce scatter in the test results. Sensor-arm extensometers, on the other hand, provide excellent repeatability, very high accuracy, and ease of use, thanks to fully automatic operation, which involves the setting of variable gage lengths. Non-contact extensometers are needed whenever the specimen would affect contact extensometers at failure or when it reacts critically to knife edges.
In brief, there is no such instrument as a universal extensometer that satisfies every customer’s specific requirements concerning measurement technology, everyday operation, and with a price that matches all kinds of budgets.
The variety of applications requires different devices with different characteristics and functions, and the extensometer should be chosen for individual applications. Users of Zwick testing equipment gain from the extensive range of extensometers available and also expert advice and consultation along with the chance to perform pre-testing in the Applications Test Laboratory prior to purchasing to ensure that the optimum device is selected for each testing application.

This information has been sourced, reviewed and adapted from materials provided by ZwickRoell GmbH Co. KG.
For more information on this source, please visit ZwickRoell GmbH Co. KG