The EPOCH® flaw detector with dual element transducers (“duals”) is used for monitoring corrosion and detecting flaws on offshore oil platforms.

Image Credit: Evident Corporation
Background
When discussing corrosion on offshore oil platforms, marine drilling risers are of particular interest. The seabed pipeline or well and topside processing equipment are linked by marine risers. The splash zone is the area immediately above sea level. Here, risers are subject to constant wetting and drying, which can contribute to corrosion if there are defects in the risers’ protective coatings.
The structural integrity of the risers is threatened by corrosion as it can reduce the wall thickness. As such, corrosion is understandably a worry for platform managers. Corrosion monitoring with NDT technologies is crucial for assessing the remaining service life of aging risers. Marine risers can be inspected for corrosion through several nondestructive testing methods but conventional ultrasonic testing (UT) is usually the most convenient and cost-effective method.
Theory of Operation
Two primary corrosion inspection methods use conventional ultrasound. The point measurement method is the first of these. An instrument like the Evident 38DL PLUS® ultrasonic thickness gage is used to take precision thickness measurements in a defined pattern. These are then repeated over time to monitor the remaining wall thickness.
This approach is good for periodic corrosion monitoring and precision measurements of discrete defects. However, it is not the best approach for identifying neighborhoods of corrosion, corrosion-induced cracking, or other flaw mechanisms.
An instrument, such as the EPOCH® 650 ultrasonic flaw detector, is used with the second method, which scans suspected corroded parts for pits and corrosion-induced cracks. It also supports length sizing and characterization of detected defects. In comparison to the first method, this approach is more appropriate for finding and sizing isolated defects. However, in terms of making high-precision thickness measurements to aid in periodic corrosion monitoring, it is less effective than the first approach.
Dependent on the corrosion inspection method the user wishes to perform, they can switch between a thickness gaging measurement algorithm (corrosion mode) and a flaw detection measurement algorithm (flaw detection mode) using the EPOCH 6LT flaw detector with corrosion software.
Edge or peak gate detection modes are typically utilized by conventional flaw detectors. This involves recording a thickness measurement based on where the edge of the echo crosses the gate or the peak of the gated echo, respectively. The echo amplitude and surface conditions can both affect edge measurement accuracy and peak detection can be insensitive to small pits.
The zero-cross measurement algorithm, typically used by corrosion gages when operating in corrosion mode, is employed by the new corrosion software for the EPOCH 6LT flaw detector. When the first signal breaks the detection threshold, this algorithm takes measurements from the zero-crossing point of this signal. This results in less sensitivity to fluctuations in coupling and amplitude and, in turn, provides greater precision when taking thickness measurements.
NDT inspectors can utilize the EPOCH 6LT flaw detector for a vast range of conventional UT corrosion inspections through a combination of the key functionalities of a precision thickness gage and a flaw detector. In flaw detection mode, users can scrub for pitting and size defects, then reliable and accurate measurements of remaining part thickness can be made by switching to corrosion mode.
The following features are all included with the EPOCH 6LT corrosion software: automatic probe recognition, do-zero offset compensation, V-path correction for dual element transducers, automatic gain control, a thickness gage measurement algorithm, and a color-coded grid view for saving thickness readings.
Equipment
NDT inspectors face a challenge with offshore oil platforms. Inspections often require rope access, with the inspector hanging over the ocean in harsh weather conditions. In such circumstances, instrument size and weight are obviously of great concern.
Ingress Protection (IP) rated to IP65/67, drop tested, and engineered to strict environmental ratings, the EPOCH 6LT portable ultrasonic flaw detector is uniquely suited for offshore corrosion inspections. It can function as both a conventional flaw detector and a corrosion gage and weighs less than 2 pounds. Offshore NDT inspectors can be confident in the reliability and usability of their flaw detector with these technical advancements, even in challenging offshore environments.
Procedure
After activating and enabling the EPOCH 6LT corrosion software, the instrument should first be calibrated in both corrosion mode and flaw detection mode for the intended material, inspection range, and general sensitivity. For supported Evident dual element transducers, Pulser and receiver settings are optimized automatically when plugged into the instrument.
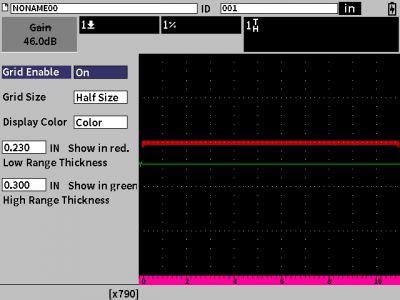
Once a two-point depth calibration in both corrosion mode and flaw detection mode has been performed, grid view can be enabled, the color selected, and low and high range thickness values set based on the inspection requirements.
When in corrosion mode and using the point measurement method to record precision thickness measurements, the grid view feature can be utilized, which acts as a visual aid for monitoring corrosion.

Image Credit: Evident Corporation
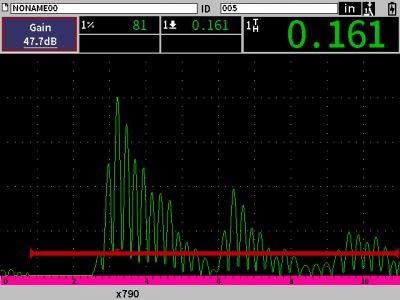
After calibrating the instrument for the inspection, flaw detection mode can be selected and the transducer coupled to the inspection material in an area without corrosion to determine the depth of the back wall. The user is then able to scan the part while monitoring the A-scan for a change in back wall thickness or the appearance of an echo before the back wall signal. The latter could indicate potential cracking, pitting, or corrosion.

Image Credit: Evident Corporation
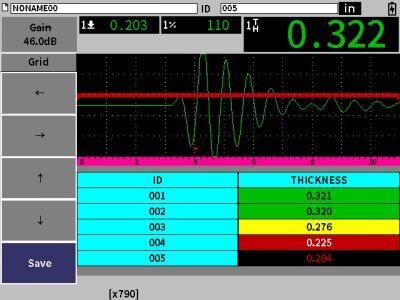
The user should switch to corrosion mode if a potential defect is identified to measure the remaining part thickness. If the user has enabled grid view, thickness readings saved into the grid will be color-coded based on the specified low and high thickness ranges.

Image Credit: Evident Corporation
Modern advancements in corrosion software offer the best of both worlds of corrosion inspection. The EPOCH 6LT flaw detector
with corrosion software provides key corrosion gage and flaw detector functionality, which enables more accurate and efficient corrosion inspections.
To find out more about the general principles of corrosion inspections with dual element transducers, whether used with a portable thickness gage, or with a flaw detector, please see the following link: www.olympus-ims.com/en/applications/corrosion-gaging-dual-element-transducers/

This information has been sourced, reviewed and adapted from materials provided by Evident Corporation.
For more information on this source, please visit Evident Corporation.