Steel is used in a myriad of applications ranging from standard construction to technical high-end products, for instance, aerospace. For high-end applications, quality is vital and even trace amount of impurities or minor defects can result in component failure under peak stress or in routine environment.
As a result, quality control in steel procurement and production has gained significance in high-end market because it now offers a broad variety of products when compared to the past.
Quality Issues
Cleanliness is one of the basic quality problems in steel production. Impurities may be generated by different influencing variables within the product during the production process.
These inclusions not only decrease the quality of the steel but also decide the application field of the material. For instance, oxide inclusions may result in increased hardness when compared to the surrounding steel matrix.
The mechanical properties of steel such as fatigue stress and toughness get considerably affected by non-metallic inclusions.
The inclusion content may have a significant impact on other key properties of steel such as physical properties, surface quality, tribologic properties, machinability and ductility. The difference in behavior in thermal expansion of the inclusions and surrounding steel matrix may cause microvoids, which, in turn, result in cracks and failure.
Hence, optimum quality must be met in the steel production and processing industry to prevent component failure in high-end critical applications and to avoid related financial consequences because of legal claims.
New European Standard
EN10247 is the new European standard that not only covers the quality assessment of steel manually, but also includes the use of an automated microscope system equipped with digital camera technology and image analysis.
The new standard supports high throughput assessment to routinely measure the inclusion content in steel. It is based on mathematical relations of inclusions to support an automated analysis against the laborious and potentially error prone manual inspection technique. Microscope manufacturers have played a key role in the creation process of the new standard.
Carl Zeiss Microscope System
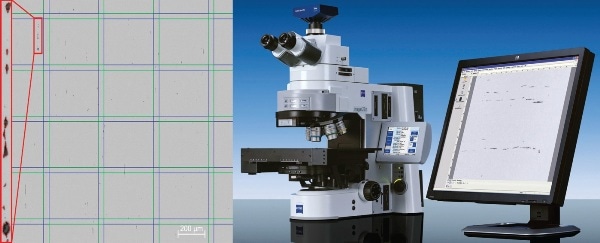
The complete microscope system provided by Carl Zeiss for automated analysis of non-metallic inclusions features the Axio Imager series microscope equipped with superior optics, a digital camera, a motorized stage, PC and software. The system can perform automatic scanning even for several samples for a sample area of 200 mm2. The NMI module of the AxioVision software provides a guided workflow for convenient operation in daily routine. The system is optimized for a specific requirement and can be used for several applications in a materials testing lab (Figure 1).

Figure 1. NMI measurement and System NMI. The left-hand side shows a tile image of a processed measurement: A critical line of oxide inclusions of 160pm in length (see magnified inset on the left) that has been both automatically detected by the system and combined into one inclusion stringer according to the standard. The right-hand side shows a System NMI based on an Axio Imager.Z2m
Significance of Sample Preparation
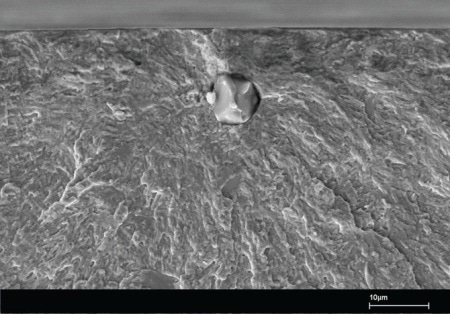
Sample preparation must fulfill new requirements for the effective determination of the quality of a steel sample using an automated microscope such as the Axio Imager.Z2m from Carl Zeiss, because the quality of preparation is crucial for automated analysis. The optimal planarity of a microsection together with a surface devoid of stains and scratches is critical for automated analysis. The use of sophisticated software like the AxioVision Module NMI provides advanced algorithms to overcome inadequate planarity and even leaves out remaining scratches from the assessment. However, a proper sample preparation is still irreplaceable. This ensures efficiency, minimizes laborious post-processing, delivers highly reproducible and stable results superior than manual inspection (Figure 2).

Figure 2. Scanning electron microscopic image of a 5µm oxide inclusion as a failure initiating site. The component failed due to a fatigue crack which was originated at the top of the unwanted feature in the microstructure within the (535A99) 100Cr6 matrix.

This information has been sourced, reviewed and adapted from materials provided by Carl Zeiss Microscopy GmbH.
For more information on this source, please visit Carl Zeiss Microscopy GmbH.