In recent years, there has been a phenomenal growth in the production of steel across the world and this is because steel is considered as an important structural material. In fact, in 2007 about 1.344 billion tons of steel were traded in the market, thanks to new entrants in the market who were able to meet the growing demands.
However, in order to ensure that steel meets its application requirements, quality control has become an important factor given that a wider range of products are now available in the market.
Steel Impurities
Cleanliness is one of the core quality issues in the production of steel. At the time of production process, different kinds of variables can promote contamination in the product. These non-metallic inclusions could occur from the lining of the furnace or from the covering slag on top of the cast. The type and quantity of non-metallic inclusions can impact the steel’s physical and mechanical characteristics such as toughness, tensile strength, fatigue limit, etc. and can cause grave failure in the whole component.
To this end, light microscopy (LM) is used to inspect the microscopic content of non-metallic inclusions in steel. This assessment is regulated meticulously by several international standards, such as DIN 50602, ASTM E45 and the new European standard EN10247. However, only EN10247 is designed for complete automated analysis by LM methods and enables the rating of inclusions in contemporary steel grades, like colored or mixed inclusions.
Workflow Task
The types of inclusions include silicates, oxides and sulfides that are easily detected by their shape, color and appearance in the light microscope. However, their actual chemical composition cannot be easily detected.
Moreover, contemporary steels have non-metallic inclusions that cannot be delegated to either of the standard inclusion categories. This issue can be overcome by using scanning electron microscopy and related x-ray element analysis methods. However, the challenge is to accurately relocate the tiny inclusions in the scanning electron microscope, which have been detected using light microscopy, and simultaneously maintain an efficient workflow.
Usually, the prominent inclusions are marked by drawing a circle around the inclusion on the sample surface, but this practice tends to contaminate the sample surface. To overcome this issue, Correlative Light and Electron Microscopy (CLEM) can be used.
Correlative Light and Electron Microscopy
A CLEM solution has been developed by Carl Zeiss that is based on a unique specimen holder, which has three fiducial markers defining a coordinate system. This system can be calibrated instantly with the AxioVision "Shuttle & Find" software module. This software module in turn integrates within the AxioVision user interface and directly communicates with the scanning electron microscopy control unit.
Instruments
A light microscope was then used to assess the minute content of non-metallic inclusions in a polished steel sample (16MnCr5 grade) at 100x magnification.
First, the sample was placed within the CLEM "Specimen Holder CorrMic Mat Universal A", which was fixed on the motorized scanning stage of the compound LM Carl Zeiss AxioImager Z.2m. Then, the coordinate system was calibrated by utilizing the Shuttle & Find software module.
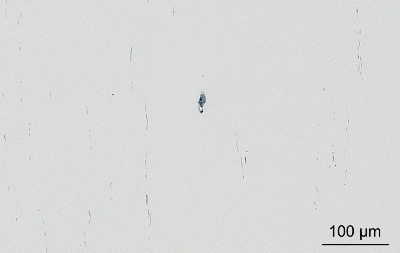
Figure 1. LM image of 16MnCr5 steel grade showing elongated and aligned sulfide inclusions (grey) and small globular oxide inclusions (black).

Figure 2. LM image of 16MnCr5 steel grade showing a conspicuous inclusion stringer.
Predictably, most of the non-metallic inclusions can be categorized as elongated sulfide stringers and mostly were unaligned oxides as shown in figure 1. However, during the assessment process, a number of prominent inclusions were identified that were large mixed inclusions encircled by a mysterious third phase.
With the help of Carl Zeiss AxioCam HRc, digital color images of these inclusions were obtained as shown in figure 2. Then, regions of interest were defined in the LM images with the Shuttle & Find software module for additional examination with scanning electron microscopy.
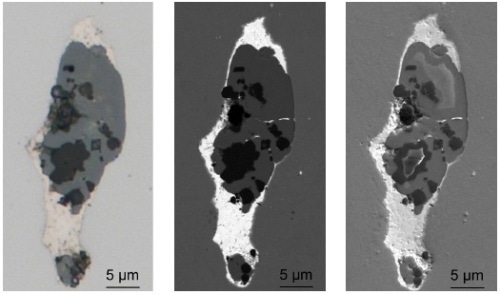
Figure 3. Brightfield image in LM (left) as well as BSE (center) and SE (right) images in SEM of the conspicuous mixed inclusion shown in Fig. 1. Images were acquired using the CLEM technique with the "Shuttle & Find" module.
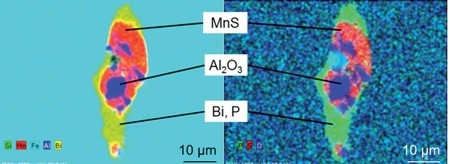
Figure 4. EDS mapping of the conspicuous mixed inclusion shown in Fig. 3. The core of the mixed inclusion consists of the "typical" inclusion types MnS (red) and Al2O3 (blue) whereas the surrounding bright phase contains the elements Bi (yellow) and P (green).
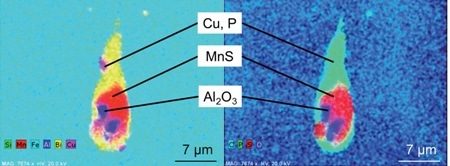
Figure 5. EDS mapping of the conspicuous mixed inclusion shown in Fig. 2 (left most particle). The core of the inclusion consists of the "typical" inclusion types MnS (red) and Al2O3 (blue) whereas the surrounding bright phase contains the elements Bi (yellow), Cu (pink) and P (green).
To perform a comprehensive morphological inspection of the inclusions at high magnification, the specimen holder was shifted to the Carl Zeiss SUPRA 40VP FE-SEM. The holder coordinate system was then re-calibrated and the LM digital image was loaded with its associated regions of interest into the Shuttle & Find software module.
After this, the selected areas were relocated instantly and accurately in the scanning electron microscope where the sample was imaged by utilizing the back-scattered and secondary electron detection as shown in figure 3. EDS mapping was done to analyze the chemical composition as shown in figures 4 and 5.
Results
The element distribution maps validate that the mixed inclusions contained aluminium oxide and manganese sulfide, while the unidentified phase contained bismuth and trace amounts of phosphorus and copper.
In accordance with the chemical composition data sheet of this steel grade, only phosphorus is allowed in trace quantities, while bismuth and copper should not be present. Thus, it can be inferred that the analyzed steel sample does not meet the specification set by international standards.
Conclusion
Shuttle & Find correlative microscopy technique provides an easy-to-use solution for analyzing and quantifying non-metallic inclusions in steel. The rating of inclusions can now be achieved in just a single analysis run, and thus provides a cost-efficient screening of polished steel samples.

This information has been sourced, reviewed and adapted from materials provided by Carl Zeiss Microscopy GmbH.
For more information on this source, please visit Carl Zeiss Microscopy GmbH.