|
This article serves as a basic introduction to the design and operation of an atomic force microscope.
The following sections cover the basic concepts and technologies that help understand the construction and operation of an atomic force microscope. It is essential to understand the contents of these sections for a complete understanding of how an atomic force microscope works.
Dimensions and Magnification
An atomic force microscope is optimized for measuring surface features that are extremely small, thus it is important to be familiar with the dimensions of the features being measured. An atomic force microscope is capable of imaging features as small as a carbon atom and as large as the cross section of a human hair. A carbon atom is approximately .25 nanometers (nm) in diameter and the diameter of a human hair is approximately 80 microns (чm) in diameter.
The common unit of dimension used for making measurements in an atomic force microscope is the nanometer. A nanometer is one billionth of a meter:
1 meter = 1,000,000,000 nanometers
1 micron = 1,000 nanometers
Another common unit of measure is the Angstrom. There are ten angstroms (Е) in one nanometer:
1 nanometer = 10 Angstroms
Magnification in an atomic force microscope is the ratio of the actual size of a feature to the size of the feature when viewed on a computer screen. Thus when an entire cross section of a human hair is viewed on a 500 MM computer monitor (20 inch monitor) the magnification is:
Magnification = 500 mm/.08 mm = 6,250 X
In the case of extremely high resolution imaging, the entire field of view of the image may be 100 nanometers. In this case the magnification on a 500 mm computer screen is:
Magnification = 500 mm/(100 nm*1 mm/1,000,000 nm)=5,000,000 X
Piezoelectric Ceramic Transducer
Mechanical motion is created from electrical energy with an electromechanical transducer. Electrical motors such as are used in washing machines are the most common type of electromechanical transducer. The electromechanical transducer most commonly used in an atomic force microscope is the piezoelectric ceramic.
A piezoelectric material undergoes a change in geometry when it is placed in an electric field. The amount of motion and direction of motion depends on the type of piezoelectric material, the shape of the material, and the field strength. Figure 1 shows the motion of a piezoelectric disk when exposed to an electric potential:
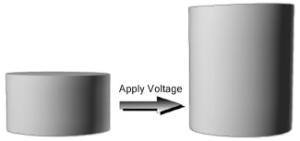
Figure 1. When a voltage is applied to the top and bottom surface of the piezoelectric disc, the disc will expand.
A typical piezoelectric material will expand by about 1 nm per applied volt. Thus, to get larger motions it is common to make piezoelectric transducers with hundreds of layers of piezoelectric materials, illustrated in Figure 2.
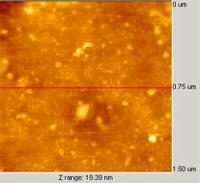
Figure 2. Applying a voltage to the top and bottom surface of this stack of piezoelectric disks causes the entire stack to expand. The amount of expansion depends on the applied voltage, piezo-material, and number of disks
By using one thousand layers of piezoelectric material it is possible to get motions as large as 1000 nm per volt. Thus with 100 volts it is possible to get 0.1 mm of motion with a multiple layer piezoelectric transducer.
Force Sensors
The construction of an atomic force microscope requires a force sensor to measure the forces between a small probe and the surface being imaged. A common type of force sensor utilizes the relationship between the motion of a cantilever and the applied force. The relationship, given by Hook's law is:
F = - K * d
K is a constant and depends on the material and dimensions of the cantilever. D is the motion of the cantilever. For a cantilever made of silicon that has dimensions of:
L = 100 microns
W = 20 microns
T = 1 micron
The force constant, K, is approximately 1 newton/meter. Thus if the cantilever is moved by 1 nm, a force of 1 nanonewton is required.
Measuring the motion of the cantilever is possible with the "light lever" method. In the light lever method, light is reflected from the back side of the cantilever into a photo-detector. See figure 3.
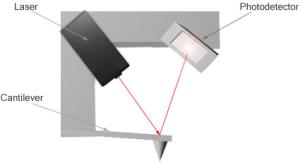
Figure 3. The light lever sensor uses a laser beam to monitor the deflection of the cantilever. When the cantilever moves up and down, the light beam moves across the surface of the photo-detector.
The motion of the cantilever is then directly proportional to the output of the photo-detector. Motions as small as 1 nm are routinely measured with the "light lever" method in atomic force microscopes.
Feedback Control
Feedback control is used commonly for keeping the motion of an object in a fixed relationship to another object. A simple example of feedback control occurs when you walk down a sidewalk. As you walk down a sidewalk you constantly control your motion by viewing the edge of the sidewalk. If you begin to walk off the sidewalk you correct your motion so that you stay on the sidewalk. Feedback control is used routinely for many common applications such as the automatic control airplanes and controlling the temperature in buildings. In the AFM, feedback control is used to keep the probe in a "fixed" relationship with the surface while a scan is measured.
Atomic Force Microscope
The theory and operation of an atomic force microscope is similar to a stylus profiler. The primary difference is that in the atomic force microscope, the probe forces on the surface are much smaller than those in a stylus profiler. Because the forces in an AFM are much smaller, smaller probes can be used, and the resolution is much higher than can be achieved with a stylus profiler.
AFM Theory
In an AFM a constant force is maintained between the probe and sample while the probe is raster scanned across the surface. By monitoring the motion of the probe as it is scanned across the surface, a three dimensional image of the surface is constructed.
The constant force is maintained by measuring the force with the "light lever" sensor and using a feedback control electronic circuit to control the position of the Z piezoelectric ceramic. See Figure 4.
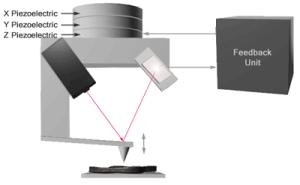
Figure 4. This figure illustrates the primary components of the light lever atomic force microscope. The X and Y piezoceramics are used to scan the probe over the surface.
The motion of the probe over the surface is generated by piezoelectric ceramics that move the probe and force sensor across the surface in the X and Y directions.
AFM Instrumentation
Figure 5 shows all of the components and subsystems of an atomic force microscope system.
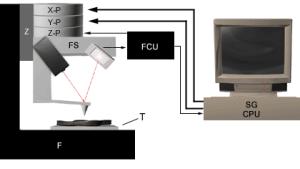
Figure 5. Components and subsystems of an atomic force microscope system.
(Z) Coarse Z motion translator- This translator moves the AFM head towards the surface so that the force sensor can measure the force between the probe and sample. The motion of the translator is usually about 10 mm.
(T) Coarse X-Y translation stage - The XY translation stage is used to place the section of the sample that is being imaged by the AFM directly under the probe.
(X-P) X and Y piezoelectric transducer - With the X and Y piezoelectric transducer the (Y-P) probe is moved over the surface in a raster motion when an AFM image is measured.
(FS) Force Sensor - The force sensor measures the force between the probe and the sample by monitoring the deflection of a cantilever.
(ZP) Z piezoelectric Ceramic - Moves the force sensor in the vertical direction to the surface as the probe is scanned with the X and Y piezoelectric transducers.
(FCU) Feedback control unit - The feedback control unit takes in the signal from the light lever force sensor and outputs the voltage that drives the Z piezoelectric ceramic. This voltage refers to the voltage that is required to maintain a constant deflection of the cantilever while scanning.
(SG) X-Y signal generator - The motion of the probe in the X-Y plane is controlled by the X-Y signal generator. A raster motion is used when an image is measured.
(CPU) Computer - The computer is used for setting the scanning parameters such as scan size, scan speed, feedback control response and visualizing images captured with the microscope.
(F) Frame - A solid frame supports the entire AFM microscope. The frame must be very rigid so that it does not allow vibrations between the tip and the surface.
Note - Not shown, is an optical microscope that is essential for locating features on the surface of the sample and for monitoring the probe approach process.
Measuring Images With An Atomic Force Microscope
• Place a probe in the microscope and align the light lever sensing system.
• With the X-Y sample and the optical microscope place the region of the sample that will be imaged directly under the AFM probe.
• Engage the Z translation stage to bring the probe to the surface.
• Start the scanning of the probe over the surface and view the image of the surface on the computer screen.
• Save the image on a computer disk.
Resolution In An Atomic Force Microscope
Traditional microscopes have only one measure of resolution; the resolution in the plane of an image. An atomic force microscope has two measures of resolution; the plane of the measurement and in the direction perpendicular to the surface.
In Plane Resolution
The in-plane resolution depends on the geometry of the probe that is used for scanning. In general, the sharper the probe is the higher the resolution of the AFM image. In the figure below is the theoretical line scan of two spheres that are measured with a sharp probe and a dull probe.

Figure 6. The image on the right will have a higher resolution because the probe used for the measurement is much sharper.
Vertical Resolution
The vertical resolution in an AFM is established by relative vibrations of the probe above the surface. Sources for vibrations are acoustic noise, floor vibrations, and thermal vibrations. Getting the maximum vertical resolution requires minimizing the vibrations of the instrument.
Probe Surface Interactions
The strongest forces between the probe and surface are mechanical, which are the forces that occur when the atoms on the probe physically interact with the atoms on a surface. However, other forces between the probe and surface can have an impact on an AFM image. These other forces include surface contamination, electrostatic forces, and surface material properties.
Surface Contamination
In ambient air all surfaces are covered with a very thin layer, < 50 nm, of contamination. This contamination can be comprised of water and hydrocarbons and depends on the environment the microscope is located in. When the AFM probe comes into contact with the surface contamination, capillary forces can pull the probe towards the surface.
Electrostatic Forces
Insulating surfaces can store charges on their surface. These charges can interact with charges on the AFM probe or cantilever. Such forces can be so strong that they "bend" the cantilever when scanning a surface.
Surface Material Properties
Heterogeneous surfaces can have regions of different hardness and friction. As the probe is scanned across a surface, the interaction of the probe with the surface can change when moving from one region to another. Such changes in forces can give a "contrast" that is useful for differentiating between materials on a heterogeneous surface.
Topography Modes
When scanning a sample with an AFM a constant force is applied to the surface by the probe at the end of a cantilever. Measuring the force with the cantilever in the AFM is achieved by two methods. In the first method the deflection of the cantilever is directly measured. In the second method, the cantilever is vibrated and changes in the vibration properties are measured.
Deflection Mode
Using the feedback control in the AFM, it is possible to scan a sample with a fixed cantilever deflection. Because the deflection of the cantilever is directly proportional to the force on the surface, a constant force is applied to the surface during a scan. This scanning mode is often called "contact" mode. However, because the forces of the probe on the surface are often less than a nano-newton, the probe is minimally touching the surface.

Figure 7. In contact mode AFM the probe directly follows the topography of the surface as it is scanned. The force of the probe is kept constant while an image is measured.
Vibrating Mode
The cantilever in an AFM can be vibrated using a piezoelectric ceramic. When the vibrating cantilever comes close to a surface, the amplitude and phase of the vibrating cantilever may change. Changes in the vibration amplitude or phase are easily measured and the changes can be related to the force on the surface. This technique has many names including non-contact mode, and intermittent contact mode. It is important that the tip not "tap" the surface because the probe may be broken or the sample may be damaged.

Figure 8. In vibrating methods, changes in probes vibrations are monitored to establish the force of the probe onto the surface. The feedback unit is used to keep the vibrating amplitude or phase constant.
Material Sensing Modes
The interaction of the probe with the surface depends on the chemical and physical properties of the surface. It is possible to measure the interactions and thus "sense" the materials at a sample's surface.
Vibrating Material Sensing Mode
As described in Section 3.2, the AFM cantilever may be vibrated to measure the force between a probe and surface during an AFM scan. The magnitude of amplitude damping and the amount of phase change of the cantilever depends on the surface chemical composition and the physical properties of the surface. Thus, on an inhomogeneous sample, contrast can be observed between regions of varying mechanical or chemical composition. Typically, in the vibrating material sensing mode, if the amplitude is fixed by the feedback unit, then the contrast of the material is observed by measuring phase changes. This technique has many names including phase mode, phase detection and force modulated microscopy.
Torsion Modes
In contact mode AFM it is possible to monitor the torsion motions of the cantilever as it is scanned across a surface.
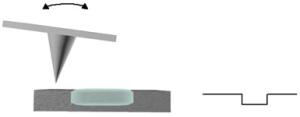
Figure 9. Torsions of the cantilever are measured in the AFM. Changes in the torsion of the cantilever are an indication of changes in the surface chemical composition.
The amount of torsion of the cantilever is controlled by changes in topography as well as changes in surface chemical properties. If a surface is perfectly flat but has an interface between two different materials, it is often possible to image the change in material properties on a surface. This technique is similar to lateral force microscopy (LFM).
|